In lack of WINDOWS' realtime performance CW-keying cannot easily be implemented under this operating system. The best solution to overcome this problem is using an external device which fulfills the necessary realtime requirements. In principal this device just needs to transform ASCII characters fed into it via a serial interface into Morse code. This is a similar task to sending RTTY, for example, which requires to transform ASCII characters into BAUDOT code. With this in mind it is almost mandatory to treat a Morse-keyer as just another digital device and to include it into the powerful MultiMode facility. This approach is implemented in TurboLog 4.
The MultiMode Facility is based on an open architecture which could deal with a wide variety of external devices. For the time being we have selected the WinKey CW-keyer provided by K1EL in order to implement CW keying. This device is rather popular and can be purchased as a kit or as a readily assembled device. A full description of WinKey is available at: WWW.K1EL.COM .
Please note:
Unlike a "true" multimode controller WinKey does not decode Morse code but transforms ASCII-characters into CW signals only. Consequently the RX-Log frame of the MultiMode Facility will remain empty except for system messages of the device which may eventually be returned from it ( turned OFF by default ).
Please also note:
WinKey's buffer can only host 32 characters. Thus, long strings need to be omitted and split under more buttons.
In an embedded keyboard based operation of WinKey as in a Station Management Program like TurboLog 4 we only need the basic features of the device. These are:
•Sending characters from the keyboard
•Sending user pre-designed text modules with placeholders
•Adapting CW speed in words per minute
•Merging letters, e.g. as in AR or SK prosigns.
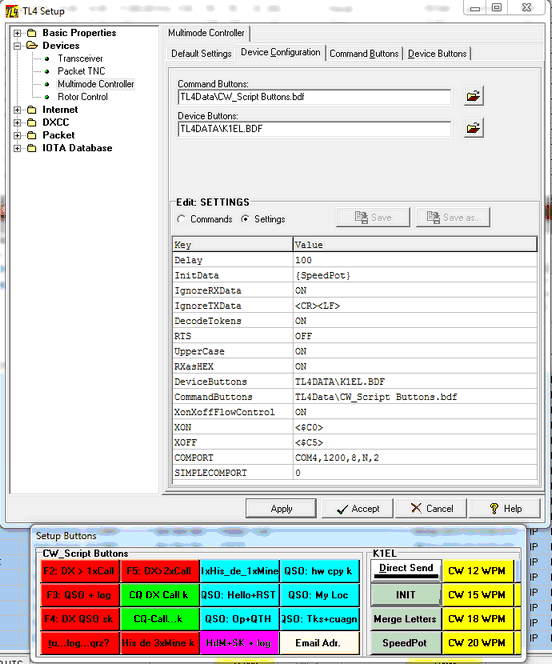
These features need to be set up on the Devices Configuration menu before operation can be started. This is the K1EL tab sheet in the DEVICES menu showing the most important control parameters:
Here again are the items you will have to pay special attention to:
1.You need to connect the keyer to your PC according to the WinKey manual.
2.You need to enable the MultiMode Facility.
3.You need to select a unique COM port as shown in the example above. The COMPORT entry in Settings will be used by the K1EL device. In case you only have USB-ports please see the topic on USB and COM-Ports.
4.WinKey is readily available from the Devices select box as the item K1EL.
5.Select the K1EL.BDF button definition file for the Device Buttons. The default for the Command Buttons needs no change for the beginning but can be further customized at any convenient time later.
Please also do not forget to press the Apply button after you have completed every single step. After you have completed all changes you can leave the setup facility.
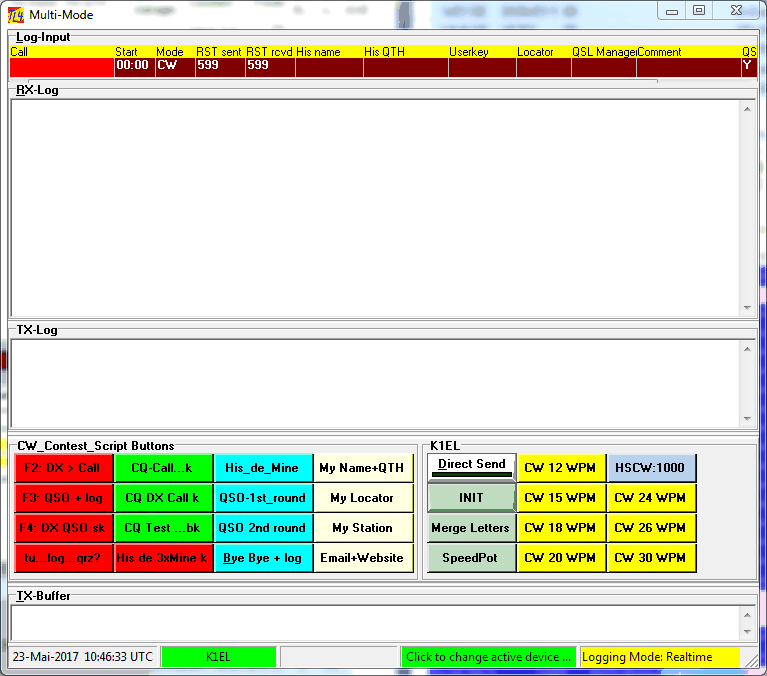
Pressing Ctrl+D will now open the MultiMode window with all features as described in the topic on the MultiMode Facility. This topic also shows a screen shot of this window. The only difference on the first glance is the content of the Device Commands group box. It has been adapted to the WinKey CW-operation in order to facilitate control of the device:
Press the INIT button before you start your operation. As outlined in greater details in the topic on the MultiMode Facility the Direct Send button should be pressed ( LED=Green=ON ) in order to enable all inputs from the keyboard being sent. Likewise, ready made text modules can be transmitted by pressing the appropriate Command Buttons.
Merge Letters being pressed ( ... or the appropriate command being embedded in the text ..., e.g. {m2l} in case of WinKey... ) will result in the next two letters being sent without letter-pause, thus forming a prosign like in AR or SK, for example.
The rest of the buttons are designed for controlling the Morse speed. The SpeedPot button will activate the speed potentiometer on the device. This allows to continuously adjust speed within the defined range according to the SpeedPot command in the device's set up. The SpeedPot allows speed adjustment even during transmission while the fixed speed buttons will become effective after a message has been sent. The HSCW button may be used for high speed CW operations ( 1000 letters per minute, transceiver permitting... ) such as in meteor scatter transmissions. It is included for demonstration purposes here.
As outlined in the setup topic on DEVICES all buttons can be customized and more buttons can be added in various ways.
Special attention should be paid on the use of command messages as described in the setup topic on DEVICES. Of particular interest for fast CW-operation in pile-ups will be the use of the SETFOCUS command. It will be desirable to keep the input focus e.g. on the CALL field i.e when short cuts are pressed or command buttons activated. This feature can be fully customized. Likewise you can select another valid field name of the loginput line ... according to your habits.
Please note:
The device can be reset by double clicking the panel showing the device's name on the Status Bar ( panel 2 by default ).
This topic was last edited on Monday, 03-Jul-2023, at 23:57

