General:
The QRZ database is a web based information service entirely devoted to ham radio activities. Over the years it has become more and more attractive due to its comprehensive database that is as up to date as normal users and DX-peditions can keep it. Certainly its use has also grown due to the availability of internet services worldwide and faster data transfer rates. Thus, the QRZ database has emerged from being a simple browser based data retrieval tool and rather become a fast real time service which can now be integrated into the most time critical logbook routines. This allows us to offer a new web based information retrieval service to the TurboLog 4 users.
Basics:
The QRZ database is an open web based architecture available at http://www.qrz.com . Everybody can get a user account and maintain his private data record(s) for free. This simply requires to log in by means of a suitable internet browser. Information can be easily retrieved from the database, e.g. by input of a call sign from which you want to receive the available data set. If you want to see information under the button Detail you will need to apply for a password which is still for free. All information display is within your browser. However, displayed information cannot be transferred into another database structure such as a logbook.
Data transfer into a logbook requires a fast access to the QRZ database via an XML-interface. This service is offered as well. However, this service requires to subscribe to it. The cost is currently $29,95 per year (12/12/2024).
Thus, if you want to use the real time service of the QRZ database in TurboLog 4 you will need to subscribe first. This can be done at:http://www.qrz.com/i/subscriptions.html .
After you have subscribed to the service with your QRZ Username and Password you are "known" by the web server. If you now move into TurboLog 4's Log Setup/Basic Properties sub item QRZ Database in order to activate the service from this side TurboLog 4's web interface will contact the QRZ server and automatically establish the connection. The handshake is based on a session password which is responded by the server. This is the key by means of which client and server will communicate throughout the whole session. However, these details are completely hidden to the user who does not have to deal with it at all.
In order to fully enjoy the online implementation of the QRZ database the following requirements should be considered:
1.Reliable internet connection
2.Preferably DSL access
3.Data transfer rate of the order of 1000 Mb/s (DSL-1000) or better.
Please note:
The QRZ database is an open framework. The database records are individually administered by the users. Despite all given data templates and examples there may be quite some variety in the content of the data fields. The data content is fully under the responsibility of the record owner. Thus, TurboLog Communications will not be liable for improper formatted, missing, misleading or false content and information retrieved from the QRZ database.
Getting started:
The QRZ database feature has to be activated in the Configuration menu, sub item QRZ Database. All necessary information is given in this topic. If you are running the Callbook CD at the same time and you do not disable this database the information from the QRZ database will supersede all of its information displays. Before you can exploit the QRZ database you will also have to subscribe to its online service as outlined above.
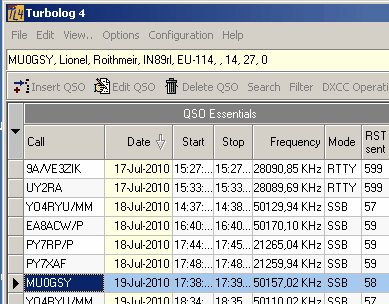
Information retrieval is triggered off upon having entered a call in TurboLog 4's call field and pressing the Cursor+Dwn key in order to leave this field. Data is also retrieved while scrolling though the logbook as the following example shows. Depending on your selection of database fields for display the result which appears in the banner line above the logbook window will come up as comma separated text the like:

Figure 337: Sample Output from QRZ Database
The output in the sample above is based on the items checked in the screen shot of the QRZ Database setup. It contains most valuable information. Besides the operator's name there is his locator, IOTA-reference and zone-numbers. Unfortunately the "0" at the end indicates he is not using the Lotw. Of course more information could have been retrieved. However, information processing requires time, for the reader and for the machine. Thus, the amount of information should always be restricted to the necessary minimum ... according to the intended purpose.
For those liking to read more. Here is an example which contains more information:
Data transfer into Log input line:
Automatic data transfer into fields on the log input line can be customized by the user and is specified in the QRZ Database setup. It saves a lot of typing and allows to include valuable information in the log, i.e. Locator, IOTA- and zone-keywords and the QSL manager, in particular. The transfer is triggered on leaving the call field by pressing the Cursor+Dwn key or by drag & drop action of an entry from the logbook. The following mapping between fields in the QRZ database and TurboLog 4's input fields is applied:
QRZ Database / TurboLog 4's input fields:
| fname | His name |
| name | His name , ( second word ) |
| addr2 | His QTH |
| grid | Locator |
| qslmgr | QSL manager |
| iota | Userkey ( first word ) |
| ituzone | Userkey ( second word as "I-nn" ), (nn = ITU-zone number) |
| cqzone | Userkey ( third word as "Z-nn" ), (nn = CQ-zone number) |
| lotw | Comment "Lotw", if lotw = "1" ) |
| eqsl | Comment "eQSL", if eqsl = "1"; second word ), provided QSL-handling is checked |
| mqsl | Comment "QSL-direct", if mqsl = "1"; third word ), provided QSL-handling is checked |
Please note:
Automatic data transfer as helpful as it is may eventually exhibit a number of potential pitfalls:
1.The QRZ data may not yield the expected information, e.g. no QSL manager's call but long text on QSLing procedures....
2.The received text is cut off because it is too long for the length of the input field in TurboLog 4. Remedy: Leave as is or increase field length as described in Field properties.
3.The record owner does not provide the desired information. Bad luck, there is nothing we can do about it.
4.Another friend may have entered "0"s where blanks are expected and vice versa.
5.The QRZ data field may contain typos ... to call it the least.
6.The QRZ data may be completely missing.
In case of problems:
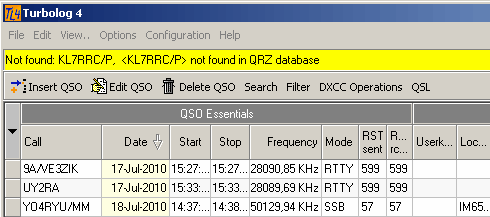
The simplest problem which may occur is a missing data record for a particular call. In this case the QRZ database will instantaneously respond with an error message the like:

Figure 339: QRZ Database - Error Message
A more serious problem is caused in case of a link failure. Typically TurboLog 4 has sent out a request ( ... because the user triggered it ... ) and the QRZ database does not respond. There is many a reason for a link failure since there are many players in the transmission chain. Thus, the only thing we can do is to allow for a small timeout before we declare the link to be broken. While waiting for a response the key logging routines will freeze. This is a nasty consequence but there is technically no way around it. The timeout is controlled by low level WINDOWS routines. Thus, there is nothing we can do about it.
After the timeout elapsed and the link was not re-established TurboLog 4 will work again as normal but without information from the QRZ database. Error messages from low level web interface routines may pop up but can be ignored and clicked off. The web link will be re-established fully automatically as soon as the server is responding without any user interaction being required. In case the going is becoming too tough because of link/server problems we recommend to turn off the QRZ database facility in the QRZ Database setup temporarily in order to wait for better times to come.
Another problem may occur in times of busy server activity, e.g. contests or multiple expeditions. The server then optimizes access times for individual clients according to their activity, say number of queries sent. In case of no activity from the client site for about two hours or so (traffic dependent) the server will even cut off connection. This can only be overcome by poking the server from time to time. In case of a disconnection due to inactivity an error message "session timed out" is generated by the QRZ.COM server. If this happened to you the link can be re-established from the Configuration Menu.
Please press the Reset QRZ.COM button on the QRZ.COM setup tab sheet.
Please note:
The link will be re-established after the second database query has been sent to the QRZ.COM server.
In order to ease problems with link timeouts and "blocking" of the input line we strongly recommend to install the MICROSOFT Loopback Adapter. This is a piece of software which simulates an existing link. Thus, in case of link failures timeouts are shortcut. Full details are available on the internet by searching for: Windows+loopback+adapter+download. The patch can be downloaded at:
http://download.microsoft.com/download/1/1/f/11f7dd10-272d-4cd2-896f-9ce67f3e0240/devcon.exe
Please follow the instructions given by MICROSOFT. There are two alternatives to proceed. However, method 2 is recommended.
Method 1:
To quickly install the Microsoft Loopback Adapter in Microsoft Windows Server 2003, use the DevCon utility at a command prompt. To download and to run the DevCon utility, follow these steps:
1. Download the DevCon compressed file, and then extract the files:
2.Visit the following Microsoft Web site: http://download.microsoft.com/download/1/1/f/11f7dd10-272d-4cd2-896f-9ce67f3e0240/devcon.exe
3.Save the Devcon.exe file to a folder on your computer, and then open the folder.
4.Double-click Devcon.exe. A WinZip Self-Extractor dialog box appears.
5.In the Unzip to path box, type the folder where you want to unzip the files, and then click Unzip.
6.Click OK, and then Close to complete the unzip process.
7.Install the Microsoft Loopback Adapter:
8.At a command prompt, change directory to the folder where you extracted the DevCon files.
9.Change directory to the i386 folder.
10.Type devcon.exe install %windir%\inf\netloop.inf *msloop, and then press ENTER. You see output that is similar to the following:
Device node created. Install is complete when drivers are updated...
Updating drivers for *msloop from C:\WINDOWS\inf\netloop.inf.
Drivers updated successfully.
| 11. | Close the command prompt. |
Click Start, click Control Panel, and then click Network Connections to verify that the Microsoft Loopback Adapter has been installed.
Method 2:
To install the Microsoft Loopback Adapter by using the Hardware Wizard, follow these steps:
1.In Control Panel, double-click Add Hardware, and then click Next
2.Click Yes, I have already connected the hardware, and then click Next.
3.At the bottom of the Installed hardware list, click Add a new hardware device, and then click Next.
4.Click Install the hardware that I manually select from a list, and then click Next
5.In the Common hardware types list, click Network adapters, and then click Next.
6.In the Manufacturers list box, click Microsoft.
7.In the Network Adapter list box, click Microsoft Loopback Adapter, and then click Next.
8.Click Next to start installing the drivers for your hardware.
9.Click Finish.
Click Start, click Settings, and then click Network Connections to verify that the Microsoft Loopback Adapter has been installed.
CLICKABLES and HOTSPOTS:
| Double Click | on banner line clears and closes it. |
BUTTONS:
| Ctrl+R | resets/clears log input line. |
| Enter | logs QSO record incl. automatically filled fields. |
| Drag & Drop | manually transfers data into log input line. |
| Cursor+Down | leaves focused field on log input line. |
| Tab | leaves focused field on log input line. |
This topic was last edited on Thursday, 12-Dec-2024, at 13:30
