While customizing the loginput line you decide which fields you want to appear on the line and arrange their order of appearance. In a second step you can now assign individual properties to every single input field. One of the most interesting features in TurboLog 4 relates to the definition of an Input stack and a Default stack for any particular field of the log input line. The Default stack contains predefined values, e.g. for transmitting Power while the Input stack is intended to collect the previous entries made from this field during the current session.
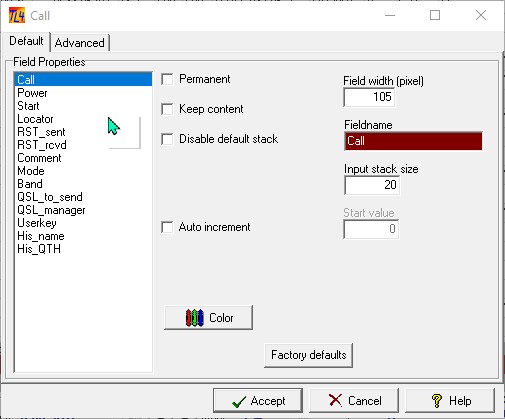
If you selected FIELD PROPERTIES from the sub menu which pops up on right mouse key click from any of the input fields the following frame appears on the screen:

Figure 192: Field Properties Tab Sheets
Default Tab Sheet:
Begin customizing a field's properties by selecting the field from the list box. Continue by selecting the Default tab.The following items can be checked as appropriate:
If you check this item it will be impossible to remove this field from the log input line while customizing the loginput line.
If you check this item the content of the selected field will be kept and not be cleared after the QSO was logged...(...which would be the normal procedure...). This feature is ideal in many an application such as contests with fixed exchange, postevent logging, etc.
DISABLE DEFAULT STACK:
Some fields of the log input line are equipped with default stacks in order to speed up the logging process, e.g. MODE, BAND, POWER, etc. Predefined entries can be recalled from the default stack by pressing Shift+Cursor+Down while the input field is highlighted. If you do not wish to see a default stack where we considered it to be useful...this is where to disable it.
The content of the default stack is available from the Advanced tab.
If you checked this item the number entered as Start value will be automatically incremented after logging the QSO.
Besides the check items there are control variables with the log input fields. They can be customized as well:
FIELD WIDTH:
The number in this box denotes the width of the input field in pixels as it appears on the log input line. If you adjust this parameter you need to make sure not to cut off parts of the caption which is assigned to the input field. The caption is aligned to the field and positioned in the line above it.
COLOR:
If you want you can change the background color of the selected field here.
FACTORY DEFAULTS:
Click this button if you got lost and want to return to a proven setup.
You can assign an input stack to every log input field. This stack is designed to store the previous entries for QSOs made from this field. If its size is set to zero the stack is automatically turned off and cannot be accessed whilst logging (...by pressing Ctrl+Cursor+Down ). If you want an input stack you can adjust its number of entry lines by editing INPUT STACK SIZE accordingly.
The automatic incrementing is started from the value entered in this field. In case of contest logging the start value can also be entered/overwritten online from the Exchange_sent field of the log input line. The content of the field can be any number.
Advanced Tab Sheet
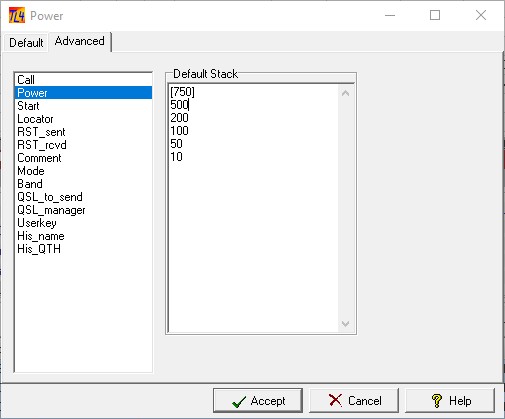
The Advanced tab should be selected if you intend to make changes on the content of the Default Stack for a particular field. In the following example the Power field was selected. The content of the Default Stack is displayed in the combo box to the right of the list box. As the memory size of the Default Stack is virtually unlimited you can add as many lines as you wish or make changes to the predefined values. Please note, however, the stack is intended to make logging faster. Depending on the individual typing capabilities it may be faster to type 3 numbers into the log input line than to scroll a stack for the correct numbers if it is too large....
You can select any of the entries as the default value to show up on the log input line. The default entry has to be placed in [....]. See the [150] in the example below. The content of the Default Stack is stored permanently.
Please note:
There is one exception for the [...]-bracketed start-up value to be shown on the log input line. The Mode default must be defined in the Bands & Modes table since this is the origin of all Modes as defined in TurboLog 4.
Please further note:
If a Default Stack exists for a particular input field your entry will be checked against the predefined values for consistency . If you enter a value which does not exist on the list or in a wrong notation an error message will be created. The RST fields are excepted from this rule. The only check on them is whether the input is a numerical value between 11 and 599.

Figure 193: The Advanced Tab Sheet
When you have finished making changes click the Accept button to save your modifications for the selected loginput field or click the Cancel button to leave the frame without making changes. Clicking the Help button will surface this help topic.
Active COMMANDS:
None, there is only mouse action and data input from keyboard in the frames.
CLICKABLES and HOTSPOTS:
| Accept | Button |
| Cancel | Button |
| Help | Button |
This topic was last edited on Thursday, 12-Dec-2024, at 13:30