General Aspects:
A graphical display which shows Packet spots being mapped on a frequency scale ( "BAND-MAP" ) has been on our agenda for a long time. A graphical representation has significant perceptual advantages in terms of faster information processing in our visual system over information displays being arranged as tables. However, developing such a display right from the scratch is quite an effort. Thus, we scanned the internet for suitable tools which we could embed in TurboLog 4 and found BANDMASTER. This tool was developed by Alex Shovkoplyas, VE3NEA, Afreet Software, Inc,. It is shareware and can be downloaded and licensed from:
http://www.dxatlas.com/BandMaster/
Bandmaster fulfills most of our requirements and its main advantage is its design as a Windows OLE module ( OLE = Object Linking and Embedding ). This means it provides a standardized interface which allows data exchange back and forth among Windows programs. For example: OLE is extensively used by Microsoft in its OFFICE suite.The programmer of an OLE module is responsible for the transferable data and most importantly for its proper documentation. Unfortunately, more could have been done with respect to a comprehensive interface description. However, you will be amazed to experience the flow of data between TurboLog 4 and the BANDMASTER module. In principal the following categories of data could be exchanged:
BandMaster Display Category for Color assignment |
Logical Return Value |
|---|---|
All time new Call ( ATNO ) |
0 |
New Country |
1 |
"Dupe" = Call known in TurboLog 4 |
2 |
Band-Country |
3 |
Not Confirmed |
4 |
New IOTA |
5 |
Table 15: Bandmaster Display Categories
Since TurboLog 4 has its own built-in DXCC and IOTA facilities we restrict ourselves to categories 1 (=ATNO) and 3 (=Call known in TurboLog 4).
How to get started:
You can download Bandmaster from the address given above. However, before you install the software package:
Please note:
You must make sure you have ADMIN-rights on your machine , i.e. if your operating system is WIN-10 or newer.
You can test the shareware for free within a grace period of 4 weeks. In order to exploit the features of an OLE module you must follow the default installation procedure. Windows will install Bandmaster ( e.g. in WIN-7, WIN-10 or newer ) on a path like:C:\Program Files (x86)\Afreet\BandMaster\BandMaster.exe
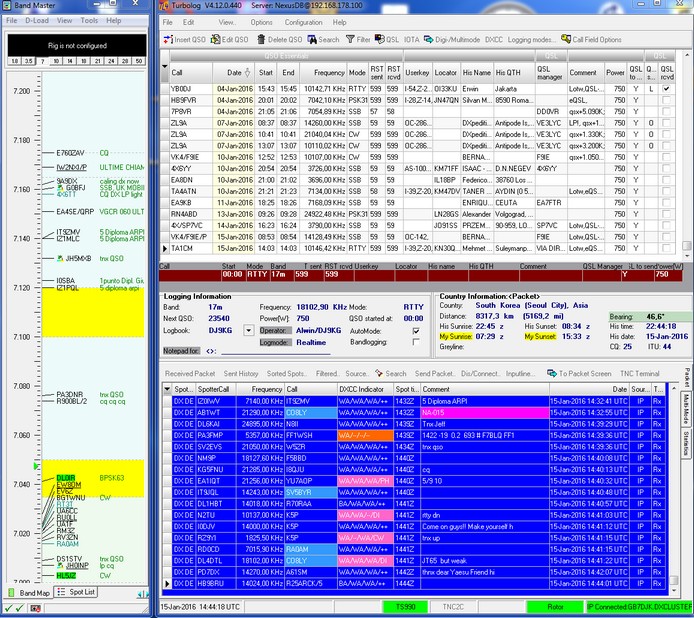
Upon successful installation you simply press the short cut Ctrl+Alt+B while the Call field is focused on the log input line. This will yield the following side by side arrangement of Bandmaster and TurboLog 4:
Please familiarize yourself with the specific HELP in BandMaster. This is necessary to understand its menu options and to properly customize the module for your habits. The Tools and the D-Load items are of particular interest.
BandMaster establishes internet connections under its own control. It connects to the DX Summit Packet cluster in Finland by default. Thus, if the display remains empty after BandMaster has been started you will need to move into the D-Loads menu for activating this link:

Figure 262: BandMaster's D-Load Menu
Activate Use Web Cluster as shown in the screen shot above. Pressing Download Spots Now will initiate the DX Summit Cluster http://www.dxsummit.fi/#/ to send Packet spots. This operation is timer based. You can set the time interval in the menu path Tools > Settings > Spots. Please also note the symbols in the right corner of BandMaster's status bar.
In addition to receiving timer based spots from the DX Summit Cluster you can also connect to a Telnet cluster in order to get spots in real time. First, this requires to select a cluster to connect to. The Tools menu offers a large selection of Telnet clusters under the item Telnet Servers... .
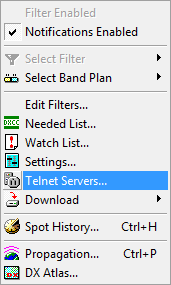
Figure 263: BandMaster's Tools Menu
Next you can activate the Telnet connection by clicking Use Telnet Clusters on the D-Load menu. However, the following important fact has to be observed:
Important note:
You must not select the same Telnet cluster in BandMaster as you normally use in TurboLog 4. The cluster will notice being connected from te same IP-Address twice and consequently reject both connections.
The following selection of Telnet clusters worked free of conflicts here:
•TurboLog 4 on GB7DJK
•BandMaster on G7RAU.
TurboLog 4 - BandMaster Interaction:
Starting the BandMaster plug-in
See the paragraph above on How to get started: Ctrl+Alt+B while the Call field is focused on the log input line. Likewise, you can start the plug-in from TurboLog 4's View menu:
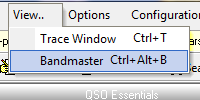
Figure 264: View Menu in TL4: Start BandMaster
Call checking
Bandmaster has no DXCC- nor Logbook Database. Thus, every incoming Packet spot is sent to TurboLog 4 for investigation. The spot's DXCC entity is derived from the Prefix of the Base Call. If there is no entry in the DXCC-database found for this particular country an all-time-new-one (ATNO) will be recognized and fed back into Bandmaster. This spot then would be represented in red color ( ... or whatever you customized in BandMaster's Settings menu as an ATNO ).
If the country was worked before TurboLog 4's Logbook database is searched. If the Call has been worked before it will be rendered in pink color which I find to be much more conspicuous than the gray default (see operational screen shot above ). If the Call turns out to be new to TurboLog 4 the entry will be in standard black color.
These and other colors can be customized in the Settings menu, sub menu item Colors.
Please note:
Unfortunately, for the time being Illegal Calls and known Calls fall into the same color category. In an update version of BandMaster there will be distinct colors for both sorts of spots.
Grabbing a Spot
Besides grabbing a spot from the displays in TurboLog 4 you can grab a spot from the displays in BandMaster which also includes setting your transceiver to the spot's frequency. Just press the Ctrl key while you left click with the mouse hovering over the desired spot.
In order to return from where you QSY-ed by this action you will simply need to press Ctrl+G.
Closing BandMaster
BandMaster will be closed automatically with shutting down TurboLog 4. It can be closed at any other time by left clicking the EXIT item under its FILE menu.
Some BandMaster Features of Interest:
The following is a short summary of interesting features in BandMaster. As already outlined above its private HELP system is worth being studied for deeper insights and exploitation of symbols and functions. Thus, the information given below is just an important subset of what is available:
Spots on green background indicate that they are 'younger' than 5 minutes. This is a fixed time.
A spot's lifetime on display can be customized in Tools > Settings > Spots.
The following context menu is available on right mouse key click over a spot:
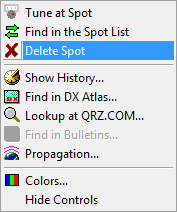
Figure 265: BandMaster's Context Menu
Clicking the highlighted option will delete the spot which was under the mouse key. As you will notice you can also open the Colors control from this context menu,
Another interesting item on the context menu above is Propagation... .
Band Master integrates with Ham Cap. This is a freeware propagation prediction tool that uses VOACAP as a prediction engine. VOACAP stands for Voice of America Coverage Analysis Program for HF Propagation Prediction and Ionospheric Communications Analysis. The VOACAP program is also known as itshfbc, or hfwin32.
The installation procedure is outlined on: http://www.dxatlas.com/hamcap/
If Ham CAP is installed on your system, right-click on a Call sign in the band map or in the spot list and click on Propagation in the pop up menu to instantly see the prediction. Two sample outputs from the tool are given below:
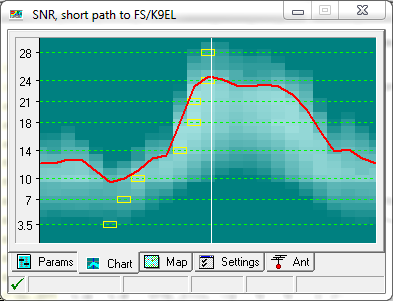
Figure 266: BandMaster's
Propagation Chart Display
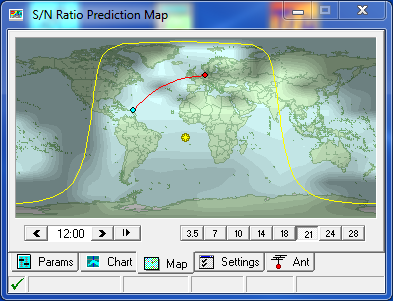
Figure 267: BandMaster's
Propagation Map Display
Active COMMANDS:
| Ctrl+ALT+B | Shortcut starts Bandmaster from within TurboLog 4 |
| Ctrl+G | Jump back from where you QSY-ed. |
CLICKABLES:
| Ctrl+Click | Grab spot from BandMaster's displays |
| Right mouse key | Over spot opens context menu |
Menu BUTTONS:
FILE
D-Load
Tools
Help
This topic was last edited on Thursday, 12-Dec-2024, at 13:30
