The QSL Label Factory is the work bench for creating new labels from the scratch, editing existing labels, adapting to given label sheets, paper formats and in particular for designing layouts for direct printing on QSL cards. Highlight of this extremely versatile facility is the built-in preview frame for the actual page layout which you are working with.
The QSL Label Factory can be accessed from the QSL Operations window by either clicking the Design or the Print button. Likewise the associated hot keys ALT+D or ALT+P, respectively, can be pressed.
When accessed by the Design button all data fields are available for editing. Entering the frame by the Print command, however, will show all fields related to the layout of the sheet being greyed out. Rationale behind this approach is that in the latter case the customer routinely just wants to apply a given layout and its associated label design for printing only. This will be the default case since labels are designed once and altered seldom thereafter. Both alternatives are described below.
Entering from the Print command:
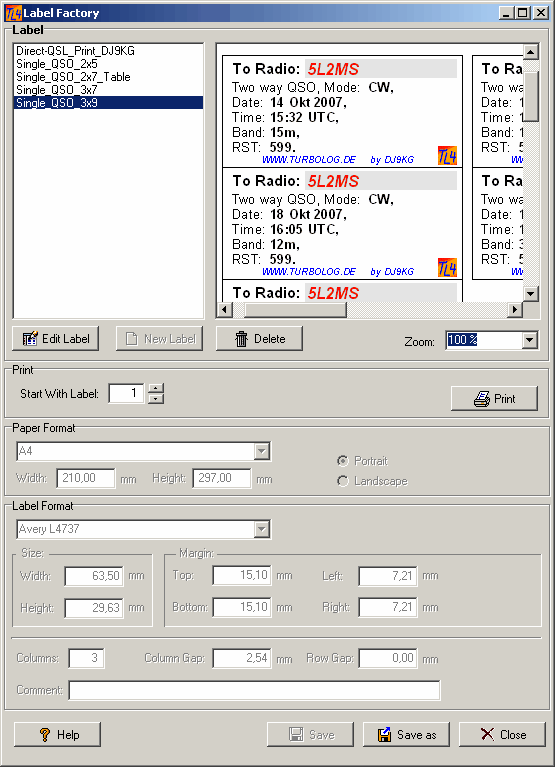
This entry point yields the frame as depicted below:

Figure 373: QSL Label Factory
The user can perform the following actions on this frame:
➢Select a label from the menu of predefined factory designs. For the time being there are designs for various Avery label sheets such as:
•Single_QSO_3x9
•Single_QSO_3x7
•Single_QSO_2x7_Table
•Single_QSO_2x5
•Direct-QSL_Print_DJ9KG
The label layout is instantly presented in the preview section next right to the label menu. This window shows the whole label page by default. The user, however, can zoom into the preview page by selecting an appropriate magnification from the drop down box right below the preview window. This is shown in the example as above.
Pressing the Delete button will remove the selected label design from the combo box. The label file, however, is not lost for ever since its file specification is just changed to *.del . Thus, the file could be recovered by externally editing its file specification to *.lf3 ( single QSO label ) or *.mf3 ( multi QSO label ), respectively. All label definitions will be found under the ...\Turbolog4\Reports directory.
➢Select the position to start printing on the label sheet. The default position is 1 ( top left label position ). Shown in the example is the outcome of selecting the second position just to demonstrate this feature and its representation in the previewer.
➢Pressing the Print button will lead to the next step of the printing procedure by closing this frame and opening the Print Preview window. This then takes over control for the final steps of printing.
➢In case the user wants a final close inspection of the label details or make final adjustments for a specific application he can press the Edit Label button. This will result in opening the QSL Label Designer window. Any potential changes on the selected label can be saved after the Designer window was closed by clicking the Save button if the modifications are intended to be saved under the selected label's name. Pressing the Save as button will allow to save the modified label under a new name.
➢Pressing the Close button will close the frame and return control to the QSL Operations window.
➢Pressing the Help button will open this help topic.
As can still be observed in the lower part of the frame each label on the menu is assigned to the parameters of a particular label sheet. For the time being the following types of label sheets are supported in TurboLog 4:
•Custom ( any type )
•Avery L4737 ( 3x9 )
•Avery L4748 ( 2x5 )
•Avery L7160 ( 3x7 )
•Avery L7161 ( 3x6 )
•Avery L7162 ( 2x8 )
•Avery L7163 ( 2x7 )
•Avery L7164 ( 3x4 )
•Avery LP4-10557 ( 2x5 )
•Avery J8160 ( 3x7 )
•Avery J8162 ( 2x7 )
•Avery J8165 ( 2x4 )
All Label sheets are in A4-format. The dimensions of the layout on the particular sheet are saved in a separate LABELS.INI file. This file can be updated with other brands of label sheets at any convenient time by the user himself. Likewise, if the necessary data is provided by a user TurboLog Communications will include this label definition in the next update version of TurboLog 4 in order to make it available to all users.
Entering from the Design button:
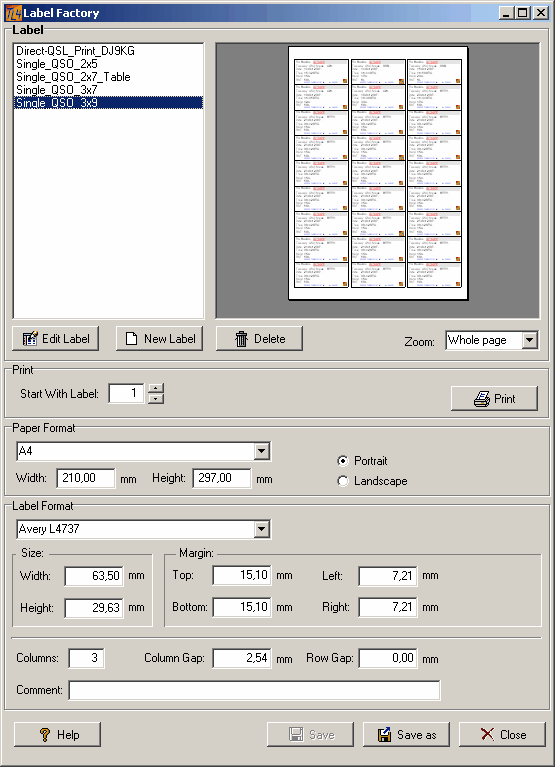
If the QSL Label Factory is entered from the Design button it will show up as follows:

Figure 374: Label Factory entered from Design Button
The frame now appears with all controls and drop down menu boxes being available in order to start a design from the scratch. In addition to the actions necessary and available while entering the frame from the Print button the following design specific inputs must/can be made:
Please note:
All dimensions are in mm only!
Paper Format:
The following paper formats are available:
•Custom
•Letter
•A3
•A4
•A5
If you select anyone of the predefined standardized formats the correct dimensions of Width and Height are automatically inserted in their fields as appropriate. In order to prevent numerical problems in case of accidentally entering a decimal zero at this point the minimum value has been set to 1,00 mm. Custom is the entry point for any size of paper which fits to your printer. Most importantly: This is the starting point for adapting direct printing on your QSL card as well. All dimensions have to be input according to your special format. Furthermore, you can select between Portrait and Landscape layouts. Most likely you will stick to Portrait which is the default for this reason.
Label Format:
This drop down menu offers the most common label sheets as requested by the TurboLog 4 usership.
•Custom ( any type )
•Avery L4737 ( 3x9 )
•Avery L4748 ( 2x5 )
•Avery L7160 ( 3x7 )
•Avery L7161 ( 3x6 )
•Avery L7162 ( 2x8 )
•Avery L7163 ( 2x7 )
•Avery L7164 ( 3x4 )
•Avery LP4-10557 ( 2x5 )
•Avery J8160 ( 3x7 )
•Avery J8162 ( 2x7 )
•Avery J8165 ( 2x4 )
If you select anyone of the predefined label sheets all the correct dimensions such as Size, Margins, Colums, Column Gap, and Row Gap are read from the LABELS.INI file and automatically inserted in their fields as appropriate. Custom again is the entry point for any size of paper which fits to your printer. Most importantly, however, it is the starting point for adapting direct printing on your QSL card as well. In the latter case you need to input all required data manually. Thus, the better procedure is most likely to start designing from the given example ( Direct_QSL_Print_DJ9KG ) on the label menu. You need to make sure all dimensions add up correctly in height and width. Thanks to the preview frame you can always monitor your actions and will immediately realize if you run off the correct track.
Size:
Unless you selected a customized paper layout you do not need to care for the inputs to this sub frame. In case of predefined label sheets Width and Height of the labels are read from the LABELS.INI file and automatically inserted in their fields as appropriate.
Margin:
Unless you selected a customized paper layout you do not need to care for the inputs to this sub frame. In case of predefined label sheets Top, Bottom, Left and Right margins of the sheets are read from the LABELS.INI file and automatically inserted in their fields as appropriate.
Columns:
In case you select a label sheet from the menu this is another parameter which will be read from the LABELS.INI file and automatically inserted in its field as appropriate. Direct printing on your QSL card requires a "1" as input to this field. For any other customized sheet size the correct input has to be made manually to this field.
Column Gap:
Unless you selected a customized paper layout you do not need to care for the inputs to this field. In case of predefined label sheets the correct separation of columns is read from the LABELS.INI file and automatically inserted as appropriate.
Row Gap:
Again: Unless you selected a customized paper layout you do not need to care for the inputs to this field. In case of predefined label sheets the correct separation of row gaps is read from the LABELS.INI file and automatically inserted as appropriate.
Comment:
This field allows you to insert any text for identification or description in order to remind you of the design purpose and to retrieve it on the first glance.
How to design a new label?
Being aware of the significance of the numerous parameters that are required for the design of a new label the following procedures are proposed:
Designing from the scratch:
1.Press the New Label button.
2.Select a label sheet from the Label Formats menu or enter a customized format with all necessary parameters and correct dimensions. Watch the preview frame for the results of your inputs.
3.Press the Save as button at the bottom of the frame.
4.Enter a descriptive name for your design and leave the file dialogue. The new name will appear on the select box for the label designs along with the other pre-designed labels.
5.Select the new name and press the Edit Label button. This will open the sophisticated QSL Label Designer.
6.Edit the empty label and fill it with all the necessary log data and additional goodies that come to your mind. You are virtually not restricted in your design.
7.Save your design before you left the QSL Label Designer.
8.Ready! Your design appears on the menu of label designs and can now be used for the first printing tests. Make any necessary improvements on the design by means of the appropriate facility until you are completely satisfied. By all means should you print some test data on normal paper sheets before you potentially waste label sheets.
Modifying an existing design:
1.Select an existing label design from the label menu box that comes close to what you bear in mind. Make sure the label content fits onto the new format. Any content off the label limits cannot be retracted into the new active label area.
2.Select a suitable label sheet from the Label Formats menu or enter a customized format with all necessary parameters and correct dimensions. Watch the preview frame for results of your inputs, i.e. for all label content being captured.
3.Press the Save as button at the bottom of the frame.
4.Enter a descriptive name for your design and leave the file dialogue. The new name will appear on the select box for the label designs along with the pre-designed labels.
5.Select the new name and press the Edit Label button. This will open the sophisticated QSL Label Designer. Edit, move items and adjust label area as available.
6.Save your design after you left the QSL Label Designer.
7.Ready! Your design appears on the menu of label designs and can now be used for the first printing tests. Make any necessary improvements on the design by means of the appropriate facility until you are completely satisfied. By all means should you print some test data on normal paper sheets before you potentially waste label sheets.
Active Commands:
BUTTONS:
New Label
Edit Label
Delete
Save as
Save
Close
Help
This topic was last edited on Thursday, 12-Dec-2024, at 13:30