General
MMTTY is a well known sound card based program for decoding and encoding of BAUDOT RTTY. It is written by Makoto (Mako) Mori, JE3HHT. The original version was optimized to fast contest operation with little emphasis on logbook features such as DXCC tracking etc. However, the optimization to minimum keystrokes and the experimental character of its technical design are unmatched as yet. Since about 2000 Mako has provided a remote controllable version of his program. This is very well suited to be run in <%PRODUCTNAME%'s> MultiMode environment. We appreciate this approach and are grateful to Mako for providing the remote control version as freeware. However, Mako has decided in his terms and conditions that every user must download his version directly from his website at:
http://mmhamsoft.amateur-radio.ca/mmtty/
Thus, TurboLog Communications is not allowed to distribute MMTTY within the <%PRODUCTNAME%'> installation package.
Please proceed to Mako's website and download the remote control ("engine") package. It is named mmtty-engine165B.zip . We recommend to unzip MMTTY.EXE and to copy it into TurboLog 4's root directory. Please also see our topic Devices for more instructions. A HELP file MMTTY.CHM for the full version of MMTTY is also available at the website. It was written by an international team of authors. We recommend to study the MMTTY HELP in order to gain a deeper insight into the program's diverse features. Unfortunately there is no dedicated HELP for the remote control version of MMTTY. The available features, however, can be found as a subset of the full version's HELP. This topic will highlight the features of the remote control version in particular. We have implemented all features made available by Mako.
Here is a short overview of the features available in the remote control version:
•Spectrum display, X-Y-scope, waterfall display.
•User configurable types of demodulators: FIR, IIR and PLL.
•User tuneable notch filter (Not.).
•Squelsh including automatic threshold control (ATC) and squelsh display.
•Lock-on to received signal (NET).
•Configurable band pass filter (BPF).
•Automatic frequency control (AFC).
•PTT via a configurable serial COMport.
•Mark, Shift to be customized.
•Signal inversion (Rev.)
•etc. ...
... just to mention a few.
Implementation
Following <%PRODUCTNAME%'s> design philosophy the MMTTY-facility is just another item of the list of the MultiMode Devices in the Configuration menu. MMTTY is controlled by a driver named MMTTY_Sound. It has to be selected and MultiMode operation which hosts all devices has to be activated. After this has been done pressing Ctrl+D from the logbook page will surface the RTTY Control panel and the Multimode user interface. Both frames can be arranged by the user at a suitable position on the screen. This is depicted in the following screen shot:

Figure 283: RTTY Contol Panel and MultiMode Window
MultiMode window as adapted to MMTTY:
The MultiMode window is described in great details in a separate topic. Shown here is an adaptation to the special requirements of remotely controlling MMTTY. Since most control is implemented in the driver the MMTTY_Sound_Device button array shrinks to just 4:
•Direct Send ( self explaining, available for all devices)
•RX/TX Toggle (same)
•Clear TX ( Clears TX-buffer and turns facility into RX-mode)
•Stop TX! ( results in an immediate stop of transmission, serves as emergency button in MMTTY
There is space for 3 more user specific buttons in this array design ... if necessary.
The MMTTY_Sound_Script button array is basically identical to the other devices. The Macro buttons are grouped by colors for fastest possible orientation and have the following meanings:
•Red Fast DX-traffic or short DX-QSOs. Buttons automatically switch PTT to TX/RX and even log as indicated.
•Green CQ calls. Buttons automatically switch PTT to TX/RX.
•Blue Standard QSO data, such as Name,QTH,Locator, etc. Buttons automatically switch PTT to TX/RX.
•White Pure text modules, to be included for transmission, if wanted.
There are 4 spare buttons in this array design at user's disposal.
The MMTTY Control Panel:
The following section summarizes the most important items which are available in the remote control version of MMTTY.
The main menu
It consists of the items:

Figure 284: MMTTY Menu Items
View(V):
The View(V) sub menu hosts the following self explaining items:
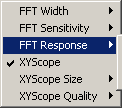
Figure 285: View Sub Menu
Each item allows to activate and/or adjust spectrum, waterfall display and X-Y-scope, respectively.
User interaction may be required in case of FFT-bandwidth, averaging(quality) and size adjustments.
Profiles(S):
This sub menu deals with various items concerning user profiles and with restoring the defaults in case one gets lost in the large variety of adaptable parameters, i.e. of the Options(O) menu:
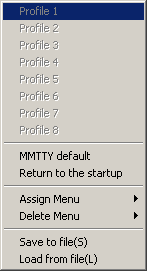
Figure 286: MMTTY Profiles Menu
There is no user action required in the beginning with this one.
Options(O):
The Options(O) sub menu is the workbench for important customizations. All parameters under this sub menu are discussed in greater detail in the MMTTY HELP. They are available from a set of tab sheets as shown below:
Demodulator:
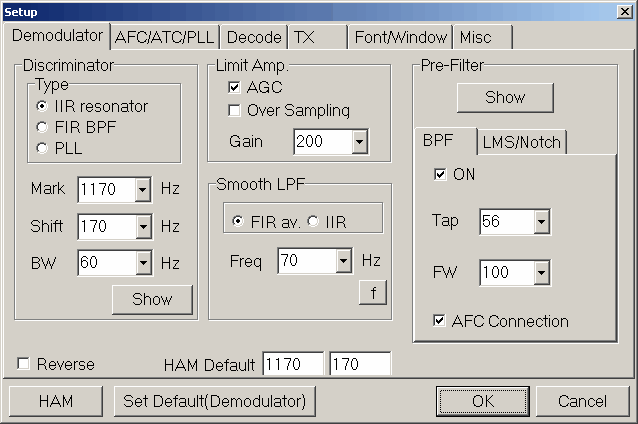
Figure 287: MMTTY Options Demodulator Tab Sheet
Some knowledge of signal processing is required in order to make meaningful changes to the items provided. In most cases, however, simply operational defaults can be selected. Thus, you can select which type of signal discriminator you want to start with ( IIR, FFR, PLL ), select important RTTY parameters, such as Mark and Shift frequency and the bandwidths for filters accordingly.
We do not recommend making changes to the Limit Amplifier and Smooth Low Pass Filter (LPF) section.
The Band Pass Filter (BPF) section should be enabled and the Notch filter on the sub tab sheet as well.
Automatic Frequency Control should be among the start-up defaults as shown.
HAM Default is a nice feature. It controls a button which will restore mark and Shift frequency to the values selected, when pressed.
Reverse will allow signal inversion. The standard setting, however, should be the defined BAUDOT character set. The option will become important in case you have to transmit or decode in the wrong side band, eg. USB instead of LSB.
The Show and f buttons will allow you to inspect filter responses on variation of parameters, such as bandwidth, steepness, overshoot, etc.
Pressing the OK button will immediately let your changes become effective. Pressing the Cancel button will allow you to leave the frame without applying any changes.
AFC/ATCPLL:
This tab sheet is depicted below:
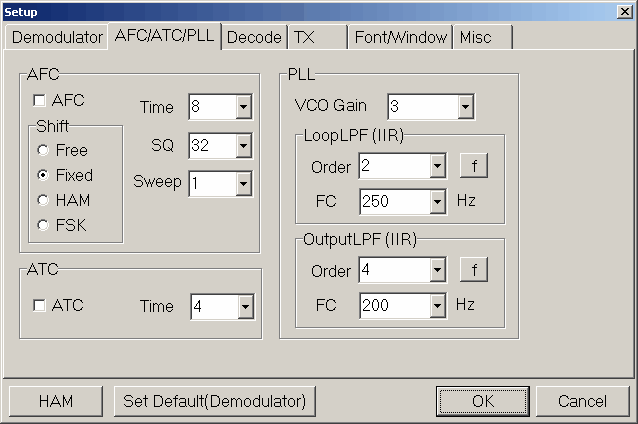
Figure 288: MMTTY Options AFC/ATC/PLL Tab Sheet
We do not recommend to make changes on this tab sheet unless you exactly know what you are doing. Even the MMTTY HELP is a bit sparse on the parameters.
The AFC section should be regarded in view of automatic adaptation to the Shift of the station received. However, keeping Shift fixed to the selected standard is a good choice for the beginning.
The ATC section ( ATC = Automatic Threshhold Control ) should be kept at the suggested value.
The PLL ( PLL = Phase Locked Loop ) demodulator requires additional parameters collected here. No changes are required at the beginning.
Decode:
This tab sheet allows you to adapt BAUDOT RTTY reception of diverse standards. All parameters necessary for this task are shown on the tab sheet below:
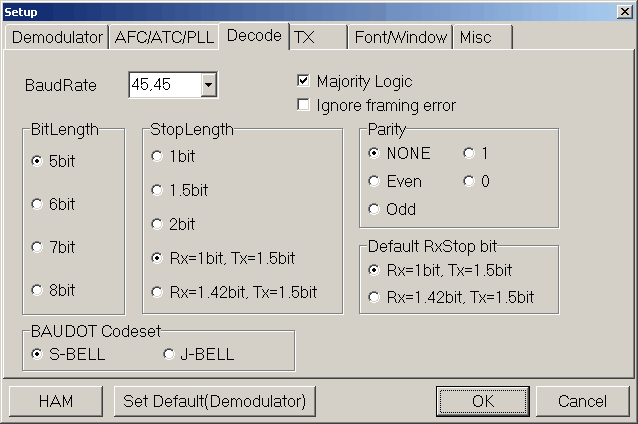
Figure 289: MMTTY Options Decode Tab Sheet
The ham radio standard Baud Rate of 45,45 Baud is the default and should not be changed. The same applies to the other sections dealing with Bit length, length of Start/Stop bit and Parity.
TX:
This is the TX tab sheet which requires some attention:

Figure 290: MMTTY Options TX Tab Sheet
The Diddle block contains important operational parameters. Making reference to the MMTTY Help, Diddle is the modulation put out by MMTTY when there are no data to transmit. It tells the other station that you are still there, and lets others tune onto you. The following options are available:
•None - MMTTY transmits a steady mark tone.
•BLK - MMTTY transmits a string of the character for blank.
•LTR - MMTTY transmits a string of the LTRS shift code. This is the standard diddle in ham radio.
•Random varies the time between diddle characters in a random way. If random is not checked, the characters are evenly spaced.
•Wait reduces the time between characters during a random diddle. You hear more diddle characters if wait is checked.
The Tx Block contains another set of critical parameters:
•UOS turns on Unshift-on-Space for transmitting. When you transmit a space, MMTTY also sends a LTR shift character.
•Double shift causes MMTTY to transmit two LTRS or two FIGS characters whenever one is called for, to lower the chance that the other station misses the shift. If the receive station receives one or both characters, it shifts properly.
•Disable wait eliminates the wait before a diddle character. It is the same as clicking the transmit wait adjustment on the transmit menu until it shows Disable wait.
•Disable Rev disables reverse on transmit, but the Rev. button still works for receive. This may be useful if for some reason your signal on transmit is upside-down from receive signals.
•Always fix shift causes MMTTY to transmit with the HAM shift, no matter how the receive shift is set.
Digital Output controls the volume of sound output from the sound card. You can also control this from the Windows mixer volume control. Try to set this so you do not have to make mixer changes when you operate MMTTY.
Char. Wait and Diddle Wait control the delay before regular data (char) or diddle characters are transmitted.
The Port window in the PTT & FSK block selects which COM port is to provide FSK and PTT outputs. The DTR and RTS on this port go HIGH when MMTTY goes to transmit mode. You can select the same port that as for the PSK facility.
The PTT line is operated by bringing the DTR and RTS COM port signals HIGH on transmit, and returning them to LOW on receive. If you discover that your PTT line always seems to be keyed, check the Invert Logic box to reverse the polarity, so MMTTY brings the DTR and RTS signals LOW on transmit and HIGH on receive.
The Radio Command Button is of no relevance in TurboLog 4 since it features a CAT system of its own.
TxBPF/TxLPF check boxes control a transmit signal shaping filter. TxBPF is a bandpass filter, and TxLPF is a low pass filter. You must decide for yourself whether you need these filters for clean RTTY transmission. Most hams leave these boxes unchecked. You can experiment with number of taps and, and press the f button to see the theoretical shape of the transmission bandpass.
Font Window:
This tab sheet contains the following options. It needs no maintenance for the beginning:
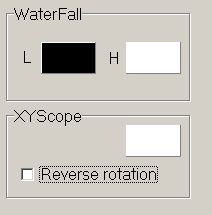
Figure 291: MMTTY Options Font Window
Misc Tab Sheet:
The Misc tab sheet as depicted below mostly contains internal and parameters for special operations which should not be altered without detailed knowledge:
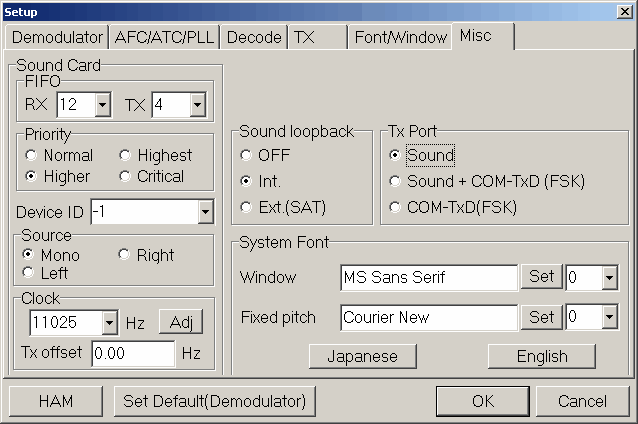
Figure 292: MMTTY Options Misc Tab Sheet
More details can be found in the MMTTY HELP.
The only modification which we suggest is to change the System Font to MS Sans Serif.
As on all 6 tab sheets: Pressing the OK button will immediately let your changes become effective. Pressing the Cancel button will allow you to leave the frame without applying any changes.
The Signal Display Block
The signal display block is comprised of the FFT spectrum display at the upper left plus the waterfall display below. The XY display is to the right. A screen shot of this assembly is right below:
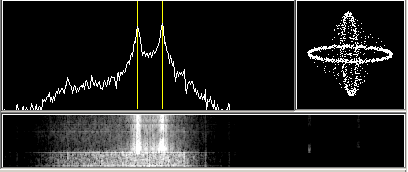
Figure 293: Signal Display Block
FFT Display:
The FFT Spectrum Display shows frequency across the horizontal axis and amplitude vertically. You can move around the full audio by putting the mouse cursor on the FFT display and left-clicking. MMTTY centers the spot you click in the audio passband. If AFC is on, a click between the mark and space signals should bring MMTTY close enough to automatically tune in the signal in a second or two. This is the way most MMTTY users tune in signals. It is also possible for you to turn off AFC and tune your radio so the mark and space signals are on the two lines. Thus, this display is an important tuning aid.
X-Y- Display:
The X-Y- display is a computer representation of the oscilloscope crossed-ellipses display that used to be the way RTTY signals were tuned, in the days of oscilloscopes.
For perfect tuning, one ellipse should be vertical, the other should be horizontal. If they are not at exact right angles, this means that the receive shift is different from the transmit shift.
Waterfall Display:
Some hams like the waterfall display that has become popular for PSK31. MMTTY offers a waterfall that is directly lined up with the spectrum display above it. You can use this display to tune your radio, rather than use AFC.
Computational Aspects of Signal Processing:
FFT, X-Y- display, and waterfall require many CPU calculations. If your computer stops working when you are using MMTTY, or if it occasionally freezes, it may be that these operations are using more CPU time than you can afford. To reduce the demand on your CPU, turn off the FFT and waterfall or the XY display. You can also reduce sensitivity, response speed, and quality to reduce demand on the CPU without losing the function. The solution is to use different combinations until you can live with the result. Using a faster machine is another solution to this problem... .
The Control Buttons
Below is a screen shot of the Control Buttons array:

Figure 294: Control Buttons
There are four buttons in this array whose operational significance is described with reference to MMTTY HELP as follows:
Fig Button:
The FIG button controls the LTR/FIG shift, and is under both operator and TurboLog 4 control. In RTTY, letters and figures share the same codes. The difference between them is whether the transmitting station sent a LTR shift or a FIG shift character before sending the character code. Once a LTR or FIG shift character is sent, it remains in effect until the other shift character is sent.
When MMTTY receives a FIG shift character, the FIG button goes down and the print comes out as figures or punctuation. When MMTTY receives a LTR shift character, the button comes up and the print is letters. If MMTTY ends up in the wrong shift, you can press the FIG button to change it from FIG to LTR or LTR to FIG.
UOS Button:
UOS stands for Unshift-On-Space, and it is under operator control. When the receive station is receiving and decoding characters, MMTTY may miss a LTRS or FIGS shift character. When UOS turned on, MMTTY shifts to LTRS as soon as it sees a space.
After characters have printed, MMTTY can reverse LTRS/FIGS--put the cursor on the word to change, and right-click.
Here are two reasons for UOS:
1.Most of what you receive in RTTY is letters, so if the program is unsure where it should be, it should use LTRS shift.
2.There is a RTTY convention that transmitting programs send a FIGS shift character whenever they are about to send FIGS, and repeat this FIGS shift after every space. However, it is not standard to send a LTRS shift after each space in word text, so if you accidentally end up in FIGS shift, there is no LTRS shift after the next space to bring you back to LTRS. The default is to return to LTRS unless the sending station tells you to go back to FIGS.
For most RTTY operators, the usual setting for UOS is on.
TX Button:
In TurboLog 4 this button is under control of the MultiMode Window. The RX/TX button is specifically designed for this purpose. However, you can still manually press the TX button on the MMTTY Control Panel to begin transmission. MMTTY operates PTT or sends a transmit command, and begins to diddle or sends what is in the transmit window.
The TX button remains down during transmission. When you are finished typing or selecting text to send, press it again. MMTTY stays in transmit mode until sends everything in the transmit buffer. During this time, the TX button shows the message WAIT , to show you that MMTTY recognized your button press, but it is finishing the job of sending. When transmission is complete, the RTTY audio stops, PTT switches to receive or a software command is sent to put the transceiver into receive mode, the Wait button pops up and changes back to TX.
TX OFF Button:
The TX OFF button stops transmission immediately. It is under control of the MultiMode Window and dubbed Stop TX! button in TurboLog 4.
Remember this button if something bad happens to your transceiver.
Signal Processing Buttons
The Signal Processing Buttons are arranged in an array as shown below:
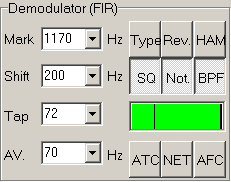
Figure 295: MMTTY Signal Processing Buttons
The four windows at the left in the picture above, are the Demodulator Controls for an IIR or FIR demodulator.
Mark:
The Mark window shows the mark tone audio frequency. In the above picture it is 1170 Hz. This value changes under software control when the AFC button is pressed, depending on the selection in the Option | Setup MMTTY AFC/ATC/PLL tab . You can select a mark frequency by clicking the arrow to the right of the mark frequency, or you can change the value in the window once you click the arrow.
Shift:
The Shift window shows the amount of audio frequency shift (frequency difference) between mark and space tones. Like Mark, it can vary when the AFC button is pressed, depending on the selection in the Option | Setup MMTTY AFC/ATC/PLL tab. In addition, each time you click the word Shift it steps through its stored values. Shift can also be selected with the arrow or changed after you click the arrow.
Baud Rate/Bandwidth/Tap/VCO:
This is a multifunction display that shows more than one value:
•If the demodulator is IIR, then clicking the word Baud changes the display to BW, or bandwidth.
•If the demodulator is FIR, the terms are Baud and Tap.
•If the demodulator is PLL, the terms are Baud and VCO.
AV/LPF/Loop:
This is another multifunction display:
•If the demodulator is IIR or FIR, the terms are AV or LPF.
•If the demodulator is PLL, the term is VCO.
The nine buttons to the right, in the screen shot above, are the Demodulator Buttons, and the squelch display is between the second and third row of buttons.
Type of Demodulator:
Each time you press the Type button, the Demodulator steps through its choices: (1) IIR, (2) Fir, and (3) PLL. The Demodulator type changes, and the demodulator controls change as well.
The default demodulator is IIR. The PLL demodulator takes very little CPU power, so if you are using an old, slow computer, you may want to try this demodulator.
Rev. (=Reverse):
Rev. Toggles between regular and reverse shift. In regular shift, if you set your transceiver to LSB, the mark tone is high and the space is lower than the mark by the amount of the Shift. In Rev. shift, the mark tone is low and the shift is up, causing space tone that is higher in frequency than the mark tone.
HAM:
The HAM button is useful after you have copied someone for a while with AFC on, and want to tune for others. Here is how it works:
Set a default mark and shift value in Options | Setup MMTTY Demodulator tab.
•Press the HAM button, and the Mark and Shift windows change to the HAM default values.
•Once the default mark and shift values are set, they need not be changed.
•The HAM default values for mark and shift can be changed on the Demodulator tab sheet ( see above ).
The HAM button also restores encoding and decoding to Baudot RTTY values, specified on the Decode tab sheet. These default values for the HAM button cannot be changed. When you press HAM, Baudot RTTY is restored.
SQ:
SQ stands for squelch. Use the squelch to prevent MMTTY from printing random characters based on noise. Here is how it works:
•Look at the horizontal indicator below the SQ button. This is the squelch indicator, or signal-strength indicator..
•There is a small vertical line in the bar, this is the squelch threshold.
•The squelch threshold can be moved by placing the cursor to the right or left, and clicking. The bar moves toward the cursor.
•Audio signal strength is shown by how far to the right the green bar extends.
•When the signal strength is greater than the squelch threshold, MMTTY decodes the signal and prints, but if it is below threshold, MMTTY does not print.
You can turn off the squelch if you are trying to decode a weak station and are willing to accept noise printing in order to catch meaningful copy as well.
Not.:
Not. turns on the DSP audio notch filter. You can use this feature to null out a nearby mark or space signal, or a tuner-upper. Here is how it works:
1.The notch can be adjusted on the Option | Setup MMTTY Demodulator LMS/NOTCH tab.
2.The Not. button turns on the notch capability, but when you first turn it on, the notch does not appear.
3.Put the mouse cursor on the FFT display to the far right, and right-click. A small triangle will appear at the cursor location. This is the notch center. The notch can be moved around using point and click.
4.To remove the notch, press the Not. button again. The next press of Not. will cause the notch to reappear.
You can set two notches on the tab. The tabs alternate with clicks. That is, set the first tab with a right-click, and the next right-click sets the second tab, while the first one stays in place.
Here is a display of one notch filter applied to the received signal. The triangle indicates the center of the notch filter. Note that the signal is strongly attenuated at that point.

Figure 296: Effect of Notch Filter
Please note:
A left-click of the mouse cursor moves the passband, while a right-click sets the notch.
BPF:
BPF stands for bandpass filter. It can be adjusted at Option | Setup MMTTY Demodulator BPF tab. This DSP filter is centered on the middle of the bandpass shown in the FFT, so all you do is turn it on and off. The usual setting for BPF is on, so MMTTY can decode well in the presence of an interfering signal.
ATC:
ATC stands for Automatic Threshold Control. This DSP function adjusts the signal input level of the comparator. The reason for including an ATC switch is that the ATC may not work well for low signal levels, at which time you may want to turn it off. ATC can be adjusted at the Option | Setup MMTTY AFC/ATC/PLL tab.
NET:
Normally, without the NET button pressed, MMTTY transmits with a mark tone at the HAM default audio frequency, no matter where the AFC has put the receive mark audio frequency. When you press NET the transmit mark frequency becomes the same as the receive mark frequency, and you will transmit right where you last heard the other station. Some hams do not realize this, and find that other hams keep telling them that they are off frequency, because they used AFC without NET.
The above holds only for AFSK, where MMTTY controls the transmit tone frequency. In FSK mode, NET has no function.
AFC:
AFC stands for Automatic Frequency Control. When this button is pressed, MMTTY varies the receive mark frequency and shift width to adjust to the received signal. When AFC is pressed, you can tune close to a RTTY signal, and in a second or two it is tuned perfectly. You can determine what can be varied automatically in Option | Setup MMTTY AFC/ATC/PLL in the box labeled Shift .
Getting started
There are only a few steps to perform for getting ready with MMTTY in TurboLog 4. These are:
1.Download the MMTTY-engine from: http://mmhamsoft.amateur-radio.ca/mmtty/ .
2.Unzip MMTTY.EXE and place it into <%PRODUCTNAME%'s> root directory.
3.Activate the MultiMode facility in the Configuration | Log Setup | Devices | Multimode Controller menu and select MMTTY_Sound .
4.Press Ctrl+D from the log page in order to open the MMTTY control panel along with the MultiMode Window.
5.Start operation.
6.Fastest procedure for switching between MultiMode devices: Just left key click once on the rightmost panel of the status bar which is labeled:  . Select the device you want to run as next from the drop down box which comes up. If you want to leave this box without making any changes you must click the Cancel button. Clicking the Accept button will close the Multimode window and reopen it with the user defined features of the new device. This device will also become the new default to come up with the Ctrl+D command when pressed next time.
If you were not familiar with MMTTY before we urgently recommend to study this Help topic and/or the MMTTY HELP file which is part of the download package.
Please note:
If you are annoyed by the stay-on-top behavior of the MMTTY control panel you can change this. Please see the Setup Devices for details.
Acknowledgements
TurboLog Communications gratefully acknowledges the outstanding development work of Makoto Mori, JE3HHT, and for providing MMTTY as freeware on his website.
We would further like to gratefully acknowledge the authors of the English Help for MMTTY.
The first version of English Help was written in 2000 as a summary and authored by Andrew O'Brien (KB2EOQ at the time, now K3UK). The Help file is copyrighted by Jan Ditzian, KX2A, beginning November 2003. Contributors to the current MMTTY Help file are:
•Oba, JA7UDE (Most of the troubleshooting solutions come from Oba)
•Phil Cooper, GU0SUP
•Jerry Flanders, W4UK
•Don Hill, AA5AU
•John Leroy, W4JKL
•Hams who ask or answer questions on the MMTTY@yahoogroups.com discussion group.
The year 2000 version of the MMTTY Help file, which provided substantial material for a new file, owes its existence to some of the above persons, along with:
•Andrew O'Brien, K3UK
•Ken Crowston, VE5KC
•Ed Sleight, K4SB
•Bill Musa, K5YG
ACTIVE COMMANDS:
KEYS:
| Ctrl+A | Selects all text in frame. |
| Ctrl+Delete | Deletes all selected text. |
| Ctrl+D | Opens the MultMode window. |
| Ctrl+S | Opens the Configuration menu for MultiMode setup. |
| Ctrl+Enter | Enters text from TX-Buffer into TX-Log. |
| Enter | Logs QSO. |
| Cursor+Down | ...from call field: Triggers DXCC analysis; sets Start time. |
| Shift+Cursor | Pushes text from TX Log into logging field. |
| Shift+CursorRight | Pushes text from TX Log into logging field. |
| Shift | Pushes text from TX Log into logging field. |
| Shift | Set Start time for logging. |
| Ctrl+X | Cut selected text. |
| Ctrl+C | Copy selected text. |
| Alt+ ... | User definable short cuts ... . |
| F1...F12 keys | User definable short cuts assigned to buttons. |
| Alt +F... keys | User definable short cuts assigned to buttons. |
| Shift+F... keys | User definable short cuts assigned to buttons. |
| Ctrl+F... keys | User definable short cuts assigned to buttons. |
BUTTONS:
| OK | In MMTTY | Options will immediately let your changes become effective. |
| Cancel | In MMTTY | Options allows leaving the frame without applying any changes. |
| Accept | Button on change active device frame, saves selection and closes box |
| Cancel | Button on change active device frame, closes box without any changes |
HOTSPOTS:
| Tool-tip | ... upon mouse over button. |
This topic was last edited on Thursday, 12-Dec-2024, at 13:30