General Remarks:
CAT operation requires a data exchange between transceiver and PC. Thus, a suitable cable connection between both devices has to be provided. The type of cable to be used along with other hard-/software components depends on the following cases:
1. Classical connection.
If the TRX provides a RS232 interface socket and the PC still is equipped with the same type of connector things are very easy. A simple RS232 cable is required and to be connected as outlined in the paragraph on Connecting your Transceiver.
2. TRX has RS232 socket, PC only provides USB serial interface(s).
This case requires suitable cabling (one RS232 cable, one USB cable) plus a RS232/USB converter box. In addition to these components a software driver must be available in order to run the converter under WINDOWS. In most cases WINDOWS will recognize the converter device automatically as soon as it is connected to the PC's USB port and install a suitable driver. Only in case the device was not recognized a driver will have to be installed manually. The manufacturer of the converter should provide this piece of software.
The driver will create a serial COM-port which can be inspected by means of WINDOWS's device manager. It is important to note the COM-port number assigned to it. The COM-port number will be needed for setting up the CAT configuration in TurboLog 4 ( see below ).
3 USB ports on both, TRX and PC:
Only a suitable USB cable will be required in order to connect both devices. Either WINDOWS automatically recognizes the TRX when it is connected or a driver has to be installed manually. It has to be provided by the TRX's manufacturer.
As above: The driver will create a serial COM-port which can be inspected by means of WINDOWS's device manager. It is important to note the COM-port number assigned to it. The COM-port number will be needed for setting up the CAT configuration in TurboLog 4 ( see below ).
Getting Started:
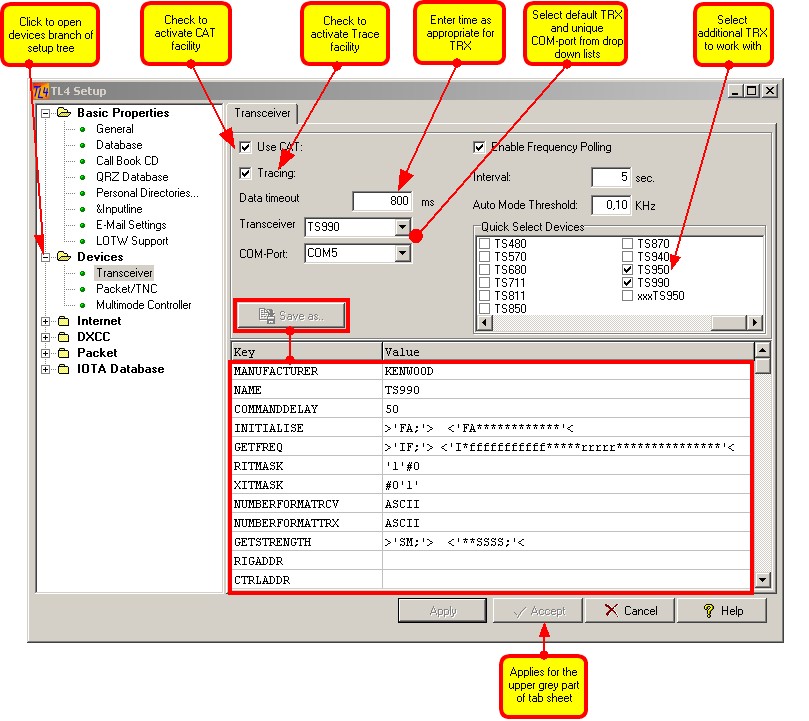
Activating the CAT facility is directly accessed by the shortcut Ctrl+T or from TurboLog 4's main menu: Configuration--->Log Setup. Opening the Devices tree and clicking Transceiver will display the CAT Setup tab sheet:

Figure 217: Tab sheet for the setup of transceivers and related items
The following steps are required for activating the CAT facility for one transceiver:
1.Checking the Use Cat check box.
2.Selecting a transceiver from the Quick Select Devices drop down list.
3.Assigning a COM-Port for the CAT operations from the drop down list.
4.Pressing the Apply button will immediately turn the changes into action and allow monitoring their effects.
5.Pressing the Accept button will immediately turn the changes into action and close the tab sheet.
Other important Parameters:
Tracing:
Normally you need not to care about the Tracing check box. Just in case something goes wrong you can inspect the trace file. It serves for monitoring purposes in case of troubles only. It can be inspected as described in the paragraph on the CAT trace facility.
Timeout
There should not be any editing required for the Timeout input field. This parameter, however, is to be adjusted as first choice if a TRX from the list does not operate properly. Based on our experience the necessary Timeout should not be larger than 1000 ms....before some other trouble has to be suspected.
Automatic frequency polling
The automatic frequency polling facility should be activated only after the CAT link proved to work reliably. This facility will poll the transceiver at the time interval specified. In order not to create too much work load for the serial interface we have limited the sample rate to a maximum of 1 per second. It can be further incremented by integer values of seconds.
Please note:
The older Kenwood transceivers seem to have a problem with the frequency read out while the tuning knob is spinning and frequency is on change. This may result in a read out value of " 0.0 KHz " because the CAT link was found to be faulty. Furthermore, the CAT link status will then turn into "yellow" which requires a re-activation by clicking the CAT panel on the status bar. In case this happens with your transceiver we recommend not to activate this facility. Just uncheck the check box for this purpose.
Please further note:
With the frequency polling being activated while you are logging QSOs there are two processes accessing the CAT link to your transceiver potentially at the same time. Provisions were taken in order to prevent access conflicts on the link. Each process will prevent the other from getting access as long as it "owns" the link. We cannot fully prevent, however, an access conflict if the link is free and both processes would claim access at the very same microsecond.... This could result in a link failure as above. However, it is very unlikely to happen. In order to totally avoid any confrlict we recommend to turn off polling, i.e. if you are logging large quantities of QSOs in contest style.
Auto Mode Threshold
While working in Auto Mode ... which is highly recommended... the entry for the Auto Mode Threshold is of some importance. The entry for this threshold must be given in KHz. The default is set to 0.10 KHz and should not be increased much but rather decreased as shown in the screen shot above.
In Auto Mode the frequency reading from the transceiver controls the following inter related items:
•BAND
•MODE
•RSTs
If the threshold was set to 0.00 KHz every small change in the frequency reading caused either by manual or automatic polling would trigger the analysis algorithm to look for the suitable BAND/MODE/RST default items according to the presets in the BANDS & MODES table. However, any threshold value > 0.00 KHz will trigger this table look-up procedure only if the threshold is exceeded in two subsequent frequency readings.
The benefit of this facility is that small tuning steps while in QSO ... i.e. in QSO-parties... will not alter the MODE and RST-readings already set. As a consequence, however, "sneaking" along the band and always remaining below the threshold between the last two readings will not alter the frequency display in TurboLog 4's logging information frame. If a QSO is logged, however, the true frequency will be read again from the CAT and this true reading will be put to log.
CAT-file:
The white sub frame contains the CAT driver ( "CAT-file" ) which contains the handshake commands for the selected transceiver. There is nothing to edit here under normal circumstances. Thus, the lower sub frame is of interest only if:
•A certain TRX is not available from the drop-down list, (  Interfacing a new transceiver is described in details in the paragraphs below )
•Command parameters need to be modified, e.g. XIT offset increment, etc.,
•New commands need to be included for new features or for a new rig,
•Command delay needs to be adjusted
•A rig address has to be changed,
•The communication parameters need to be adapted, etc.
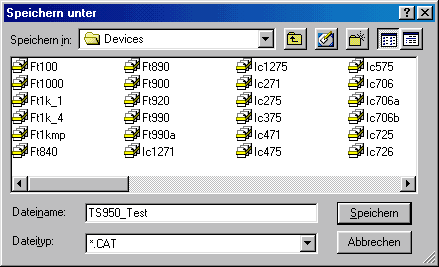
The sub frame can be edited to make the required adjustments just by Clicking into it. Editing, however, should be done by the experienced user only. If you have completed editing the Cat file you need to Press the Save as.. button in order to save the changes. It is good practice not to overwrite the original file but to create a new name for the modified file that makes sense to you. The WINDOWS standard Save as.. dialogue box pops up (...in your native language...depending on the country in which you licensed your copy of WINDOWS...) and allows you to make the appropriate inputs.

Figure 218: The Save as... dialogue box
Press the Save button in order to save the defined CAT-file under a new name and to close this dialogue box. Pressing the Cancel button will close this box without any further action.
When you press the Apply button on the tab sheet you can immediately turn your changes into action. Leave the setup tab sheet after you made all the required inputs by Pressing the Accept button and if you want to save your modifications. Press the Cancel button to leave without making changes. Pressing the Help button will bring up this help topic.
Hot keys/Shortcuts:
| Ctrl+T | Directly opens the Transceiver tab sheet from anywhere in the program. |
| Ctrl+Shift+T | Directly toggles the CAT connection to the Transceiver to ON/OFF |
CLICKABLES and HOTSPOTS:
| Click | Selects line for editing; diverse button actions. |
| Double Click | Expands tree view. |
BUTTONS:
| Accept | Accepts inputs and leaves frame. |
| Apply | Puts changes into action immediately. |
| Cancel | Cancels all changes and leaves frame. |
| Help | Opens (this) help window. |
| Save as.. | Saves edited CAT file. |
Save
This topic was last edited on Thursday, 12-Dec-2024, at 13:30