Multi QSO labels are well suited to save money on label sheets and QSL cards. Thus, we have equipped TurboLog 4 with a most versatile, powerful and user controllable multi QSO label designing and printing facility. It capitalizes on the implementation of the single QSO label design and printing infrastructure. We achieved our design goals in providing a user interface which looks and feels identical to the user for both types of QSL operations. The internal data structures, however, had to be processed in a completely different way. Thus, we virtually had to "abuse" the Fast-Report ( http://www.fast-report.com. ) for the aim of printing the data the way we wanted. This approach turned out to become an extremely difficult and demanding task. At the end, however, TurboLog 4 now offers a very flexible and user friendly multi QSO label design and printing facility. It exhibits unprecedented features and degrees of freedom for customization .... and is implemented by using just one printing tool!
Since the multi QSO label facility is a logical extension of the single QSO label operations we strongly recommend to become familiarized with its basic features. They are described in great details in the topic on QSL operations.
In this topic we will refer to the general features of the QSL Label Print control window, the QSL label factory and the QSL label designer. Thus, we will emphasize on discussing the extensions, special features and differences as applicable to the multi QSO label facility.
How to start:
The Multi QSL Label facility can be entered either from the Options menu as a separate sub item or by pressing Ctrl+M from anywhere in TurboLog 4. This will open the QSL Label Print control window which allows you to select the QSO records for printing by various categories. Noteworthy differences are some sorting features on the left side column of the control panel which are superfluous or need to be blocked since the log data necessarily has to be sorted by Call order only.
The most important and extremely useful new feature, however, is the sorting by a minimum user specified number of QSOs per call. This will allow you to apply different multi QSO labels according to the number of QSOs for a particular call. This will save money and prevent empty label space, e.g. 2 QSOs on a label that has a capacity of 10. This unique facility is described below.
In order to select the records for printing on a multi QSO label you will mostly address specific calls or blocks of data, e.g. from a user definable time period. The QSL via item, however, is of even greater significance here. It can be used to select QSOs which were flagged Y, B or D for example ( ...while logging or later, before printing, after you overlook how often you have got him ... ). These QSOs can now be printed on specific multi QSO labels or as singles.
All other controls are identical. They are available as described in QSL operations.
You will normally leave this window by pressing the Print button in order to enter the QSL Label Factory.
Please do not forget to press the Mark as sent button on your way back into this window after you successfully printed your labels.
Please note:
The QSL via menu is available only if the QSL Status menu is set to its default item Any Status. Vice versa: The QSL Status menu will be available only if the QSL via menu is on the All item. This is necessary in order to omit conflicts and/or identical query items from separate menus.
Please further note:
The check marks may become visible for the first time only after the logging grid is forcibly refreshed, e.g. by clicking into it, for example.
Sorting by number of QSOs per Call:
This unprecedented facility is of enormous use in printing multi QSO labels. In principle it allows multiple runs over the QSL data to be printed. The user specified minimum number of QSL records is applied to a sophisticated sorting algorithm. The output from this procedure is a list which contains calls which appear at least as often as specified.
The rationale behind this approach is as follows:
Let us assume you have designed two multi QSO labels which you want to apply. A small label may have a capacity of 3 QSOs and a large label may allow for 7 QSOs. After you have selected the range of records to be printed you will perform a run for a minimum of 4 records per label in the first step. The output from this sorting will be printed on the 7-QSO-label and the printed records will be marked as sent.
Next comes a run for a minimum of 2 records. This run will now sort out all calls with 2 or 3 records. The output will consequently be printed on the 3-QSO-label and marked as sent as well.
The remainder will now consist of single QSOs only. Those records can finally be printed by using the single QSL label printing facility ( see topic on QSL operations ). Of course it is up to you to print single QSOs on the 3-QSO-label as well which reduces printing to just 2 steps.
The sorting mechanism can be accessed from the Multi-QSL Label Print control window as shown below in a cut-away screen shot:
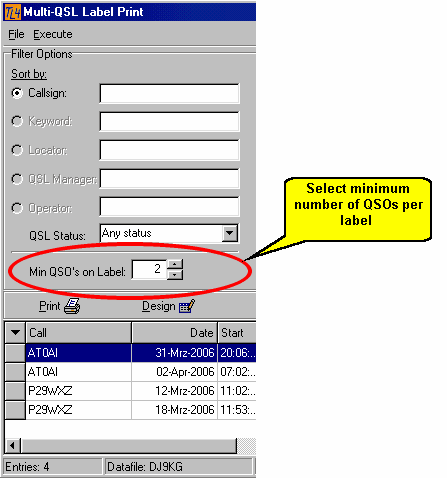
Figure 388: Cut-away section of Multi-QSL Label Print Window
Please note:
The sorting by a minimum number of QSOs per label results in an exhaustive search through the log's database. Depending on the complete query this may require significant resources and computing time. The combinatorial explosion is mainly driven by the number of QSOs within the selected range. If, by accident, you happen to sort for 2 ( ... as in the screen shot ) but over the whole log ( say: 10.000 QSOs plus...) you will most likely run into the database timeout barrier. This is set to 100 seconds for the time being. If you really need to sort numbers the like and/or you have a slow machine the solution simply is to partition the range into smaller fractions.
The Multi QSO Label Factory:
Further steps must be performed in the QSL Label Factory. The user interface to this facility is identical for single and multi QSO labels except for the pre designed labels on the menu. The different default entries on the menu are depicted in the following screenshot:
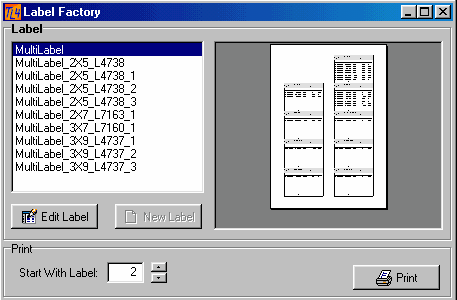
Figure 389: Upper part of the Multi QSO Label Factory ( excerpt )
As will be noticed there are ready-to-use label designs for the most popular Avery label sheets:
•L4737, 3x9
•L4738, 2x5
•L7160, 3x7
•L7163, 2x7
Other designs can easily be derived from these templates by the user himself (see below). The preview frame to the right of the menu box shows a miniaturized view of the first labels to be printed in order to receive an impression of the page layout. The next step will be to select your favorite choice of label from the menu. A detailed view of the outcome of your choice is provided by the Print Preview which will come up on clicking the Print button. The next steps are again identical for all QSL label operations.
Editing/Designing Multi QSO Labels:
The good news is: The full range of design and editing features as described in the topic on the QSL Label designer is available for multi QSO labels as well. The internal structure of a label design, however, is much more complicated than for a single QSO label. Reason for this is the table like data structure which has to be maintained and mapped into the label's working area.
Thus, we strongly recommend not to start a multi QSO label design from the scratch. This is a task for the very experienced user only. In place of that all editing and design work should be started from an existing label which is smaller in size than your target label. Furthermore, you should always have selected some real QSO data as inputs before you start editing the label designs.
There are two ways to start:
1.You can always enter the editing process by clicking the Edit Label button from the QSL Label Factory. This will open the QSL Label Designer window and allow you to apply your modifications to the selected label and save it under a different name on closing the window. This is the recommended procedure for customizing your labels while sticking to the same type of label sheet.
2.If you want to create a label on a different type of label sheet you should start from the QSL Label Print control window by clicking the Design button. This will bring the QSL Label Factory frame to screen with the New Label button being enabled. Click this button and select a label design from the menu which is smaller in size (... or at least very close in size, if larger ...) to your target label. Next you need to select your target label sheet from the Label Format menu. If it does not exist on the menu you will need to define it by stepping through all of the size related menus of the QSL Label Factory. After you have completed these steps you can enter the editing process itself by clicking the Edit Label button from the QSL Label Factory.
What you will typically see in the QSL Label Designer window is depicted below by means of a cut-away section of it:
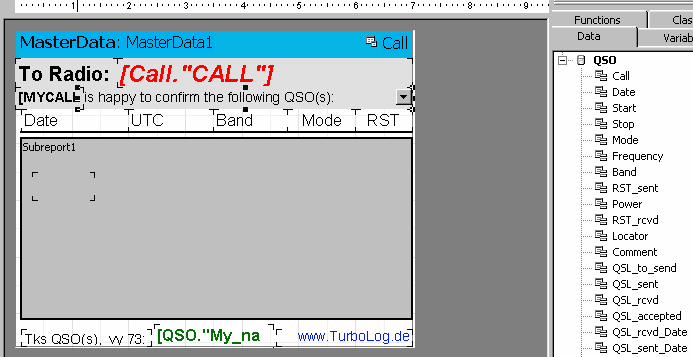
Figure 390: Cut-away section of QSL Label Designer showing multi QSO label design, MasterData1 page
The label design looks clear on the first glance. The complexity of its internal structure, however, becomes visible by inspecting the design tree which is shown below:
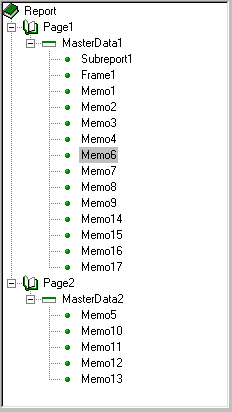
Figure 391: Multi QSO Label design tree
As can be seen the print report consists of two pages or sub reports, namely MasterData1 and MasterData2 which are internally connected. The design of MasterData1 is shown above while the MasterData2 page is given below:
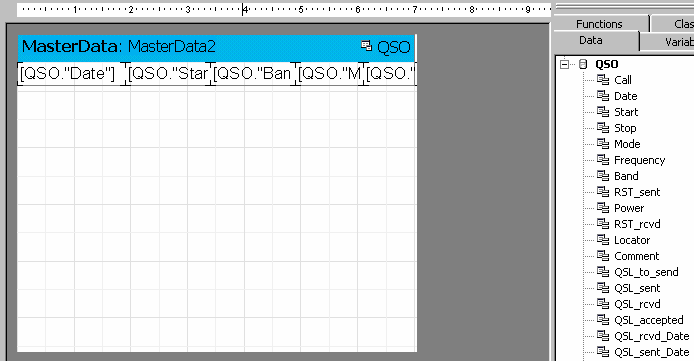
Figure 392: Cut-away section of QSL Label Designer showing multi QSO label design, MasterData2 page
Both pages can and/or need to be edited. The MasterData1 page comes up by default. It contains header and footer information which can freely be customized. The dark gray section "covers" the MasterData2 page which can be accessed either by double clicking the left mouse key while over this area or by clicking the MasterData2 item on the design structure tree ( see above ).
Generic variables can easily be placed on both pages by picking them from the tree structures to the right of the QSL Label Designer and by applying mouse dragging and dropping at the correct positions.
Please note:
The MasterData2 page may only contain QSO-variables as shown above. MasterData2 is mapped into the dark grey area of the MasterData1 page. The size of this area can be edited by clicking into it and moving its grip-marks by means of the mouse. Furthermore, be aware of the headers in MasterData1 not being fixed to the data fields in MasterData2. Thus, you are responsible yourself for field alignments of corresponding fields on both pages. There are important features attributed to the headers on MasterData1, in particular underlining and alignments of text. Carefully pay attention to these features.
It is good practice and strongly recommended to start by applying small changes and watching their effects. Your design work will be remarkably eased by applying the preview facility of the QSL Label designer. It is available from its menu bar or by pressing Ctrl+P. Despite applying even small steps, while using this facility in the design loop you will rapidly end up with the desired result.
For the whole bunch of editing tools and artwork which can be applied to single and multi QSO label designs reference is made to the detailed descriptions in the topic on the QSL Label designer.
Two complete examples of designs for multi QSO labels and label outputs filled with real data are given in the topic on Standard Labels.
Active Commands:
KEYS/HOTKEYS:
| ALT+P | Start printing. |
| ALT+G | Go! Start search/computation. |
| Ctrl+M | Globally: Opens Multi QSO Label facility. |
| Ctrl+L | Locally: Load report parameter file. |
| Ctrl+N | New: Resets Report file to factory defaults. |
| Ctrl+P | Opens preview facility in QSL Label Designer |
| Ctrl+S | Saves report parameter file. |
| Return/Enter | Navigate through input fields; enable selected stack data. |
| Ctrl+CursorDown | Opens the input stack. |
BUTTONS:
New Label
Edit Label
Design
Mark as sent
Save as
Save
Close
Help
Go
SQL Query
Go
| Select All | Selects all available log fields for listing. |
| Deselect All | Un-selects all available log fields for listing. |
| Select All | Selects all available log fields for listing. |
| Deselect All | Un-selects all available log fields for listing. |
CLICKABLES and HOTSPOTS:
| Drag lines off the top or left side rulers | ....as positioning aids. |
| Double clicking | ....select field for editing. |
| Drag & Drop | ....Variables into label area. |
| Tool tips | ....popping up on mouse over. |
| X | ....quit editing frame without saving changes. |
| Drag separator of grid columns | ....Arrange width of columns. |
This topic was last edited on Thursday, 12-Dec-2024, at 13:30