This is the maintenance center for most of the IOTA support in TurboLog 4, in particular for the IOTA Status Display as outlined in the topic of this very name.
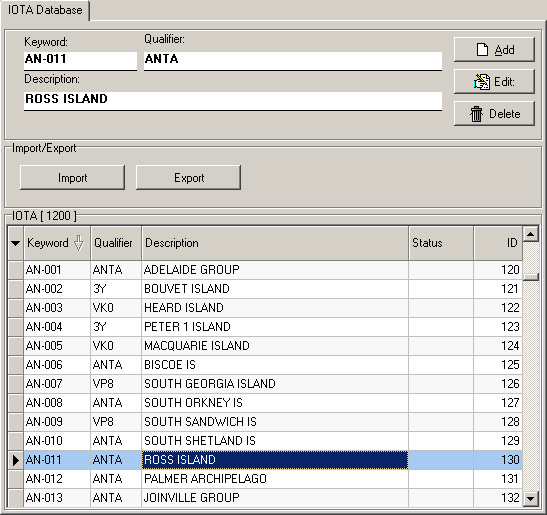
Expanding the IOTA-branch of the Log Setup menu and clicking the IOTA sub item will surface the following tab sheet:

Figure 142: Setup for the IOTA Database
The tab sheet basically hosts a database grid with a number of external controls and input fields:
Database columns:
Like in any other database grid all columns qualify as sort master. Please observe the vertical arrow which marks the master column and sort order. The master column can be selected by clicking its header. A scroll bar is available and can be moved in order to select any database record.
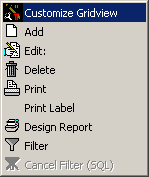
The standard right-mouse-key-click context menu is available while the mouse is positioned over the grid area:

Figure 143: Context Menu
Operations like:
Add,
Edit,
Delete,
etc. can either be commanded from the buttons on the tab sheet or from the context menu.
Keyword:
This is the IOTA identifier consisting of the continent shortcut plus consecutive island number.
Qualifier:
This entry serves as the search key when entered from the Call field on the loginput line. The qualifier is basically a DXCC country's main prefix but may include a call area designator ( 1 ... 0 ) as well.
Description:
This column contains the name of a single island or a group of islands.
Status:
A reserve field for the time being.
ID:
This column simply contains the line number of the IOTA record.
Input fields:
For ease of operation all editing can be performed in separate input fields for
Keyword,
Qualifier and
Description.
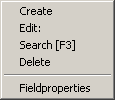
A right mouse key click on anyone of the input fields will open the following context menu:

Figure 144: Context Menu
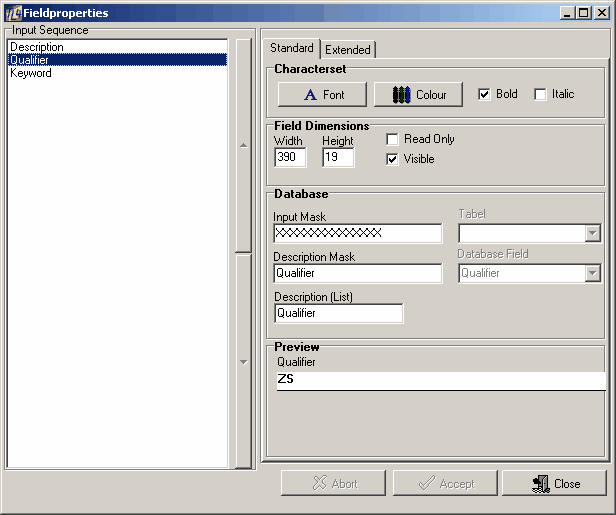
While the items Create, Edit, Search and Delete are self explaining the item Field properties offers some interesting features as outlined in the next screenshot:

Figure 145: Field Properties and Editing Features
As can be seen the available input fields can be styled individually in various aspects such as
•Font
•Color
•Field Dimensions
•etc.
The result of customization can be inspected in the preview field at the bottom of the frame. All changes can be either
•Accepted
•Aborted
•and the frame be Closed
by clicking the appropriate control button at the bottom of the frame.
Control buttons:
The following controls are available on the tab sheet:
Add:
Clicking the Add button will create empty input fields and a new line in the data grid.
Edit:
Clicking the Edit button will turn the grid's background color into light yellow. The data of the selected record appears in blue color in the entry fields, now ready for editing. In order to finish editing please again click the Edit button.
Delete:
Clicking the Delete button will erase the selected database record. Please be careful with this option.
Export:
Clicking the Export button will convert the IOTA.NX1 file into an ASCII file and save it.
Import:
Clicking the Import button will allow you to select a suitable ASCII keyword file and convert it into a NX1 file.
Click the Apply button to let your changes become effective. Leave this tab sheet after you made all the required inputs by Clicking the Accept button if you want to save your modifications. Click the Cancel button to leave without making changes. Clicking the Help button will bring up this help topic.
BUTTONS for tab sheet control:
| Accept | Accepts inputs and leaves frame. |
| Apply | Puts changes into action immediately. |
| Cancel | Cancels all changes if not in action yet and leaves frame. |
| Help | Opens (this) help window. |
| Abort | Ignore changes and leave. |
| Close | Closes frame. |
This topic was last edited on Monday, 03-Jul-2023, at 23:56