The content and layout of the logbook window (aka "QSO Grid" ) can be fully customized. Columns can be arranged as to best fit the user's requirements. The field widths can be adjusted to the best representation of all data which they contain. Furthermore fields can be totally removed in order to adapt to various logging modes, such as realtime, postevent, contest or expedition logging. Of course all fields will be maintained internally, there will always be a way back to the full content of the log records.
In order to customize the logbook window please follow the instructions given below:
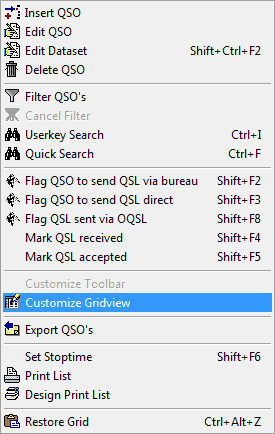
"On line" customization is outlined in chapter General features. These procedures are fully based on mouse action in the logbook window itself. More rigorous customization can be started by Right Mouse Key Clicking on any field of the data grid. This will open the following menu box:

Figure 161: Right Mouse Key Context Menu
The following actions can be started from this menu:
Insert QSO:
This menu item is identical to the one on the main menu. It will allow you to insert a QSO into the QSO grid.
Edit QSO:
This menu item is identical to the one on the main menu. It will allow you to turn the grid into editing mode.
Delete QSO:
This menu item is identical to the one on the main menu. It will allow you to delete a selected QSO from the list. Since there is no way to restore the QSO data after this operation has been performed you will be prompted for reconsidering your intention.
Filter QSO's:
This menu item provides access to the powerfulSQL facilities. It is identical to the item Filter on the main menu. Filtering means to apply a SQL string on the QSO data in order to find specific information. Queries can be simple or complex depending on the task. There is virtually nothing in the log which cannot be retrieved or modified by SQL.
Cancel Filter:
This item will remove the filtering of the QSO data. If the grid was modified by SQL for special displays and does not return into its layout as before you should apply the item Restore Grid ( see below ). Likewise you could apply Customize Gridview in order to select your customized layout from the list of options.
Userkey Search:
This item allows you to start a simple search for Userkeys. Likewise this search task can be commanded by pressing Ctrl+I while the logbook page is on display.
Quick Search:
This item opens an easy to run search facility for the most common search tasks in a logbook, such as for Band, Mode, Prefix/Call, Country, etc. . Likewise this search task can be commanded by pressing Ctrl+F while the logbook page is on display.
QSL Operations:
This menu item is identical to the QSL item on the logbook's main menu. It will allow you to perform the following QSL operations:
•Flag QSO to sent QSL via bureau Shift+F2
•Flag QSO to sent QSL direct Shift+F3
•Flag QSL sent via OQSL Shift+F8
•Mark QSL received Shift+F4
•Mark QSL accepted Shift+F5
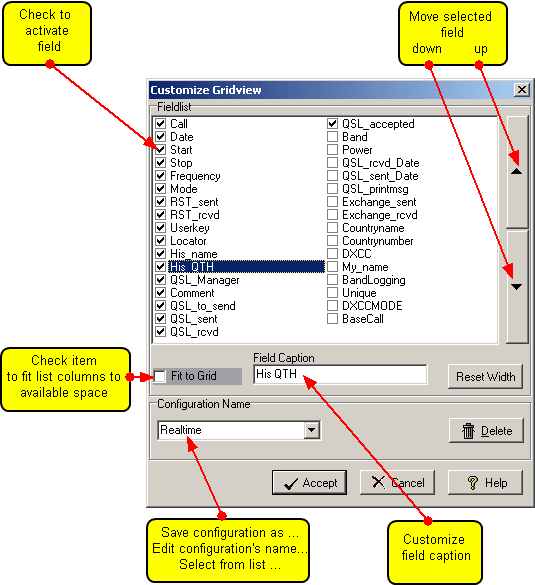
Clicking the Customize Gridview item will open the following frame:

Figure 162: Customizing the Logbook Grid
The outline of this frame is identical to the one constructed for customizing the Bands & Modes table except for the data which it contains.
Every checked input field will automatically appear along with its caption on the header line of the logbook window. The arrangement of the grid columns of the logbook window is from left to right. The leftmost position is equivalent to the top of the select frame.
For ease of operation the short cuts Ctrl+A will check while Ctrl+Y will uncheck all items.
When you have finished making changes click the Accept button to save your modifications under the selected configuration name or click the Cancel button to leave the frame without making permanent changes. Clicking the Delete button will generate a dialogue on whether you really want to delete the selected configuration and remove its name from the list.
If you want to create a new Configuration you can start from anyone of the defaults, making field arrangements according to your needs and finally editing the selected name to whatever makes sense to you. Click "Accept" in order to save the new configuration under this name. Your customized list will immediately be activated.
The Reset Width button should be pressed if you got lost in amending the fields. This operation then results in restoring the factory defaults.
If Fit to Grid is checked the program will try to best fit the columns selected for display to the available space in the logbook window. This fit, however, is for the current session only unless you leave the frame with the box checked, enter the frame again, uncheck and leave.
Clicking this item will restore/refresh the layout of the QSO grid according to the Configuration which was active before and selected under the Customize Gridview item ( see above ). Likewise you can press Ctrl+Alt+Z while the logbook page is on display. Restore Grid also performs a Cancel Filter operation if there was an active filter on the log data.
Export QSO's:
This item allows you to export a single or a range of QSOs. The file dialogue box opens in order to let you select a file which to export to. Pressing the SHIFT+LEFT Mouse KEY selects range limits of log records
Set Stoptime:
This item allows you set Stop times individually for Calls logged while you are in an ongoing QSO party. As soon as someone leaves the party you can log Stop time accordingly. For ease of operation you can press Shift+F6 while the appropriate log record is selected.
Print List:
A printout of the log can be started by means of this item. You should select the range limits of the log records to be printed before you go ahead. You are prompted by the printer dialogue before the Preview of the print is displayed.
Design Report:
Finally there is access to the Print Report Designer from the context menu as well.
Active COMMANDS:
KEYS:
| Ctrl+A | will check all items. |
| Ctrl+Y | will uncheck all items. |
| Ctrl+I | opens Userkey Search dialogue. |
| Ctrl+F | opens Quick Search dialogue. |
| Shift+F2 | Flag QSO to send QSL via Bureau. |
| Shift+F3 | Flag QSO to send QSL direct. |
| Shift+F8 | Flag QSL sent via OQSL |
| Shift+F4 | Mark QSL received. |
| Shift+F5 | Mark QSL accepted. |
| Shift+F6 | sets Stop time in a QSO party. |
| Ctrl+Alt+Z | restores layout of QSO grid. |
| SHIFT+LEFT KEY | Selects rangelimits of log records. |
CLICKABLES and HOTSPOTS:
| LEFT KEY CLICK | on row: Selects/highlights this particular row. |
BUTTONS:
| DELETE | Deletes selected configuration, prompts before execution. |
| ACCEPT | Accepts selected configuration. |
| CANCEL | Cancels all changes and editing made so far. |
| HELP | Opens (this) help window. |
| RESET WIDTH | Resets field widths to factory defaults. |
| FIT TO GRID | Arranges columns to best fit to window size. |
This topic was last edited on Thursday, 12-Dec-2024, at 13:30