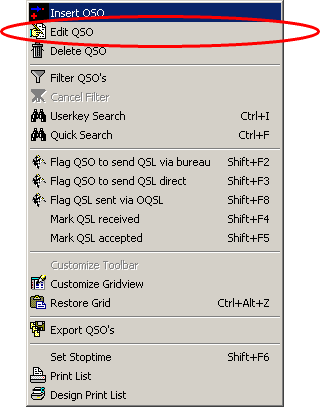
This is the anticipated standard procedure for editing a QSO or a range of QSOs in the logbook's data grid. This way of editing the log can either be started from the Edit item of the main menu or by Right Mouse Key Clicking into the logbook window. This pops up the following context menu box:

Figure 162: Right Mouse Key Context Menu
Press Esc to remove the pop up.
Selecting the sub item Edit QSO will turn the highlighted QSO (=QSO line turns into light blue...) into editing mode. The field under the cursor is preselected for editing. This mode is characterized by the background color money green.
This standard procedure can be shortcut by highlighting a log record and a field to edit and Pressing F2. This turns the review window into editing mode and prepares the particular field of the log record for immediate editing. The review window remains in editing mode until this mode is Terminated by Clicking Outside the Window, e.g. into the Call field. You are prompted for the changes you made ( see below). Pressing Esc will always terminate all editing without saving any changes. Thus there will be no further prompting for saving the changes already made.
We now have to distinguish very carefully between line editing, field editing and character editing. Since most editing will concern single characters in fields instead of a whole line or field we have designed the editing procedures as to start with character editing by default.
We follow the WINDOWS conventions with respect to editing ( Ctrl+X, Ctrl+C, Ctrl+V, etc. ). Besides the character keys from the main keyboard the following control keys become active:
INSERT
DELETE
BACKSPACE
HOME
END
ENTER
CURSOR RIGHT & LEFT ..... for navigating in the field.
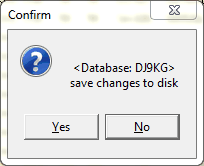
After all changes have been applied you can leave the editing mode by clicking into another record line. This will surface the prompt for saving the changes or not:

Figure 163: Yes/No Prompt
Click YES to save or NO for not to save the changes. Doing this you are still in editing mode as the money green color of the logging window indicates and you can continue to make changes in other log records. If you want to finish editing: Press Esc now.
In order to continue: Click into another field.
Please note:
This field now turns into dark blue color which indicates editing has now turned into field editing by WINDOWS conventions. Please be careful since pressing DELETE in field editing will delete the content of the whole field on one keystroke. Only a double click will turn the field into character editing mode and the money green background of the field comes up as before. If you want to return into character editing mode you always need to click and watch for the money green background to appear.
For ease of operation under editing the following fields are equipped with stacks which pop up automatically to select the proper choice from:
Mode
Band
RST
The existence of a stack is indicated by a small arrow head to the right of the field, pointing downwards.
Selecting Insert or Delete from the pop up menu will always do line editing. This implies Insert will create a blank new line which could be edited on putting it into field or character editing as described above. Delete will remove the line from the log and you are prompted before this action is performed.
Furthermore, editing of the following fields will automatically adjust other fields due to the relations defined in Bands & Modes and in the Country/Prefix database:
| Call or Prefix | Countryname |
If log maintenance requires the selection of a range of log records please proceed as follows:
First step:
| LEFT CLICK | ... into data grid in order to select it. Then: |
Next:
| SHIFT + LEFT KEY CLICK | Selects/highlights first log record (Likewise: CTRL + LEFT KEY CLICK ) |
| SHIFT + LEFT KEY | Selects last record for the range |
| CTRL + LEFT KEY | Allows to add separate records for the range. |
The range of selected log records has turned into dark blue background color on this operation. This has prepared the records for bulk processing by the following actions which can likewise be selected from the editing-popup menu:
| Shift+F2 | Flag QSO to send QSL via Bureau |
| Shift+F3 | Flag QSO to send QSL direct |
| Shift+F8 | Flag QSO sent QSL via OQSL |
| Shift+F4 | Mark QSL received |
| Shift+F5 | Mark QSL accepted |
| Shift+F6 | Set QSO Stop time for selected log record(s), single record or range of records. |
Logging in QSO net operations is facilitated by means of the Shift+F6 key. You should log all Calls in the net in single log records while you enter the net. If someone leaves the net you should select the particular log record. Pressing Shift+F6 will set the Stop time to the current time. If you should leave the net yourself you must select the records for the remaining stations. Pressing Shift+F6 will now set the Stop time in all selected records. For ease of operation you are not prompted on this operation. The current time is immediately applied. The overwritten entries cannot be retrieved.
Pressing the DELETE key will remove the whole range of selected log records but you are prompted before this becomes effective.
A nice feature assists in logging: You can select a call from a log record and put it into the Call field of the loginput line by drag & drop action. Likewise you can use the hot key Ctrl+G for this operation (...G for "grab").
Along with the Call the contents of the following fields of the log record are grabbed and placed in their equivalents on the log input line:
Active COMMANDS:
KEYS:
INSERT
DELETE
BACKSPACE
HOME
END
ENTER
ESC
| CURSOR RIGHT & LEFT | for navigating in the field |
| Shift+F2 | Flag QSO to send QSL via Bureau |
| Shift+F3 | Flag QSO to send QSL direct |
| Shift+F8 | Flag QSO sent QSL via OQSL |
| Shift+F4 | Mark QSL received |
| Shift+F5 | Mark QSL accepted |
| Shift+F6 | Set Stop time |
| F2 | Start editing |
| Ctrl+G | Grab Call from log record, place in loginput line |
CLICKABLES and HOTSPOTS:
| LEFT KEY CLICK | Selects/highlights field or log record line |
| SHIFT + LEFT KEY | Selects range of log records |
| RIGHT KEY CLICK | Activate popup menu |
| DRAG & DROP CALL | Grab Call from log record, place in log input line |
BUTTONS:
| YES/NO | Dialogue |
This topic was last edited on Monday, 03-Jul-2023, at 23:57