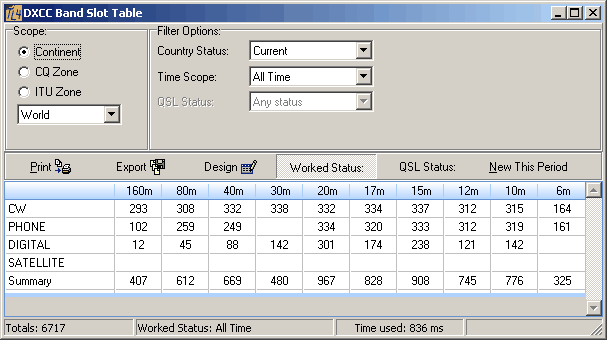
The DXCC Band Slot Table is best suited to summarize the DXer's performance in terms of working the most possible DXCC countries on the given DXCC Bands by using the defined DXCC Modes. Among the various DXCC Displays in TurboLog 4, the DXCC Listings and the DXCC Summary the Band Slot Table offers the most compacted view of the DXCC database in your log.
The Band Slot Table is available from the Options > DXCC Operations sub menu. The following is a screen shot from this table:

Figure 328: DXCC Band Slot Table
The philosophy behind the numbers is as follows:
As defined by the ARRL's DXCC board there currently are four DXCC Modes: CW, Phone, Digital and Satellite. CW and Satellite are unique Modes other than the group modes Digital and Phone which both cover a subset of Modes. For example: Digital includes RTTY, PSK31, JT65, etc and Phone is a container for SSB, AM, FM, etc. By definition the table will only display your achievements within the Digital and Phone group in a compacted line entry. Thus, individual members of the groups will not be displayed separately in the Band Slot Table. However, numbers are in total accordance with the DXCC Summary Display. More detailed insights into the group modes ... if wanted ... are provided by the DXCC Listings.
The default display mode of the Band Slot Table is controlled by your settings in the Configuration menu on the DXCC tab sheet.
In the style of the DXCC Listings the following controls are available:
Continent:
The user can select continents from the drop down list for analysis:
| World | = All continents |
| EU | = Europe, |
| NA | = North America |
| SA | = South America |
| AF | = Africa |
| AS | = Asia |
| OC | = Oceania |
| AN | = Antarctica |
For the time being the default is on World.
CQ Zone:
For ease of operation the drop down box offers zone numbers 1 ... 40 in order to select from.
ITU Zone:
For ease of operation the drop down box offers zone numbers 1 ... 90 in order to select from.
Please note:
Countries covering more than one zone will be called by each of its zone numbers.
Country Status:
The drop down box offers the following choices with respect to the country's DXCC status:
| Current | = List of the current DXCCentries. |
| Deleted | = List of the deletedentries. |
| DXCC | = List of current plus deleted entries. |
| Non DXCC | = List of non DXCCentries. |
| All | = List of all fore standing categories. |
The countries found with respect to these categories will be counted in the Band Slot Table.
Time Scope:
This drop down box is enabled if the Worked status button has been pressed. The following choices are offered:
This Period
Other Periods
All Time
The start time of This Period is defined in the DXCC menu and displayed in the frame's header line.
QSL Status:
This drop down box offers the following choices:
Any ( corresponding to Worked Status )
QSL received
QSL not received
QSL accepted
QSL received & not accepted
We do not distinguish between the time periods with respect to QSL status. The only question of interest concerning QSLs is whether the card was received or not, regardless of time period.
Worked Status:
The grid will display the worked status with respect to Scope and Filter Options.
QSL Status:
The grid will display the QSL status with respect to Scope and Filter Options.
New This Period:
Pressing the New This Period button will display your achievements with respect to new ones during the current period. Every new country, band point or new mode on a particular band will be shown. Of course the governing Scope and Filter Options apply under this condition.
Print:
Pressing the print button will convey all grid data to the print routines. Before rendering the displayed data and graphics as a DXCC Print Report the user can control its layout by means of the Print Preview facility. Before the Print Preview screen opens, however, the printer setup is called in order to allow you to select a printer, page size, page orientation and the like.
Export:
Pressing the Export button will start the Print Preview facility which contains a special menu item for export control. Before the Print Preview screen opens, however, the printer setup is called in order to allow you to select a printer, page size, page orientation and the like. For the time being TurboLog 4 offers export to:
Text file export ( ASCII )
EXCEL
HTML
Design:
See topic on Print Report Designer.
ACTIVE COMMANDS:
BUTTONS:
Worked Status
QSL Status
New This Period
Export
Design
CLICKABLES and HOTSPOTS:
| Drag separator of band columns | Arrange width of columns. |
This topic was last edited on Thursday, 12-Dec-2024, at 13:30