The Packet setup consists of the following sub items:
Voice alertsCW/E-Mail alerts , ( CW alerts & E-Mail Messaging ),
Alarms ,
Highlighting LoTW User Activity
These sub items cover connecting TurboLog 4 to packet clusters and other packet related items, such as alerts, commands and handshake data. The input is to be performed on tab sheets. The tab sheets are placed in a frame which also contains the control buttons Accept, Apply, Cancel and Help.
==========================================================
The sub item Cluster connect strings is accessed from the following tab sheet:
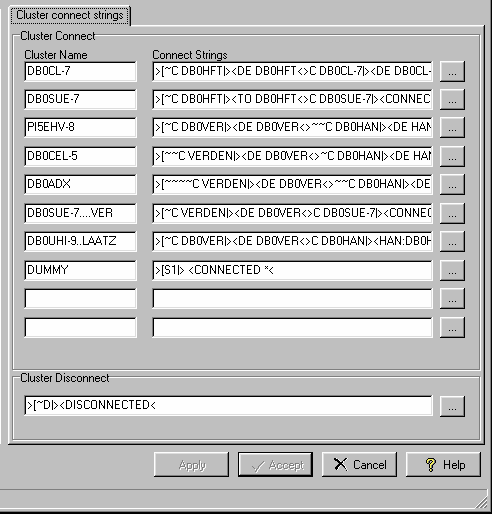
Figure 131: Cluster Connect Scripts
This is the place where you enter the handshake strings which your TNC automatically transmits/receives when you want to connect to a remote Packet Radio cluster. There is space for a total of 10 of your most favored cluster sites. Each field of this tab sheet can be edited directly by clicking into it. You are free to select any reasonable name for the cluster which you want to edit. Its name will later appear on the status bar when selected for connect.It makes sense though to select the call of the cluster site as used in the examples above.
The connect string assigned to a cluster name can be edited directly in the input field as well. Clicking into the field will activate the editing mode. Likewise you can click the dotted button to the right side of this field. This will open an editor box for the selected string:
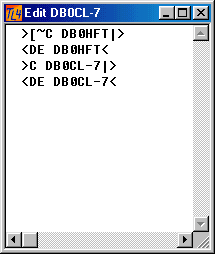
Figure 132: Editing Connect Scripts
The box will be closed with all changes saved by simply clicking the X button.
The notation in the box is as follows:
A string to be transmitted to the TNC/Cluster has to be contained in: > ...... >
A string to be received from the TNC/Cluster has to be contained in: < ...... <
The example shows a connection which is to be established via a digipeater ( DB0HFT ). The first string which TurboLog 4 sends to the TNC needs to command the TNC to establish a connection. The TNC is turned into its command mode by means of the Escape character [ . The ~ allows the TNC to take a small delay for this operation in order to get ready before the command string itself "Connect DB0HFT" has to be received from TurboLog 4 and processed. The next line lets the TNC wait for receiving a string which contains ...DE DB0HFT... Presumably the digipeater will prompt: DJ9KG DE DB0HFT if the connect was successful. This fulfills the wait condition. The TNC will now transmit C DB0CL-7 which is the call of the final destination, the DX-cluster. Again, the TNC waits for a string containing ...DE DB0CL-7... assuming the DX-cluster will prompt something like DJ9KG DE DB0CL-7 upon a successful connection. This will be interpreted by TurboLog 4 as a successful connection as well and the data which flows in upon this event is directed into the Packet grids.
Some clusters send prompts like: DJ9KG DE DB0HFT (17:02 UTC)> . In this case and if you want to see all the welcome messages a cluster may send you can specify the expected response to read:
<)\><
This looks highly cryptic, however, what it does is just to wait for ...)> being received. The backslash just serves to indicate that > in this case is to be interpreted as a character and not as a message bracket control.
Cluster response strings can also given as:
<# DE DB0HFT<
Where the # stands for your call ( = MyCall).
Please find more details on TNC string notations in the paragraph on TNC script file.
There may be connections which need more then one intermediate step or which will address the DX-cluster directly if it is in reach of the user's antenna. The strings have to be edited accordingly.
There should no editing being required for the disconnect string:
>[~D|><DISCONNECTED<
The same philosophy applies as for the connect sequence. The TNC is commanded to disconnect the connection to the cluster/digipeater by transmitting D|. Upon arrival of a string containing ...DISCONNECTED... the connection is resolved. Depending on the status and the activity of the TNC and/or the cluster this may take several seconds. In case an almost immediate disconnect is required the disconnect command should be sent twice, thus reading:
>[~D|D|><DISCONNECTED< .
This notation will in particular make sure that the TNC is in reset state after the user has exited the program without prior disconnecting manually from the cluster.
Fortunately all clusters/digipeaters follow this scheme. The disconnect string thus applies for all Packet Radio connections.
Please note:
In order to properly edit a connect string you need to have a priori knowledge of the prompts and calls of the digipeaters and clusters you are aiming at. In order to gather this most important information you have the following choices:
•Ask an experienced ham from your local radio club.
•You may go by a manual connection to radio clusters and explore the prompts and available calls of digipeaters and clusters.
•As a user of TurboLog 3 you simply copy your successful connect strings 1:1 into the edit fields.
If you have finished making changes on the tab sheet you can save your modifications by pressing the Accept button. If you want to save your changes and want to let them become active immediately you need to click the Apply button. This includes the action of the Accept button. Clicking the Cancel button will close the tab sheet without saving any changes. The Help button will surface this help topic.
===========================================================
The sub item Packet commands is accessed from the following tab sheet:
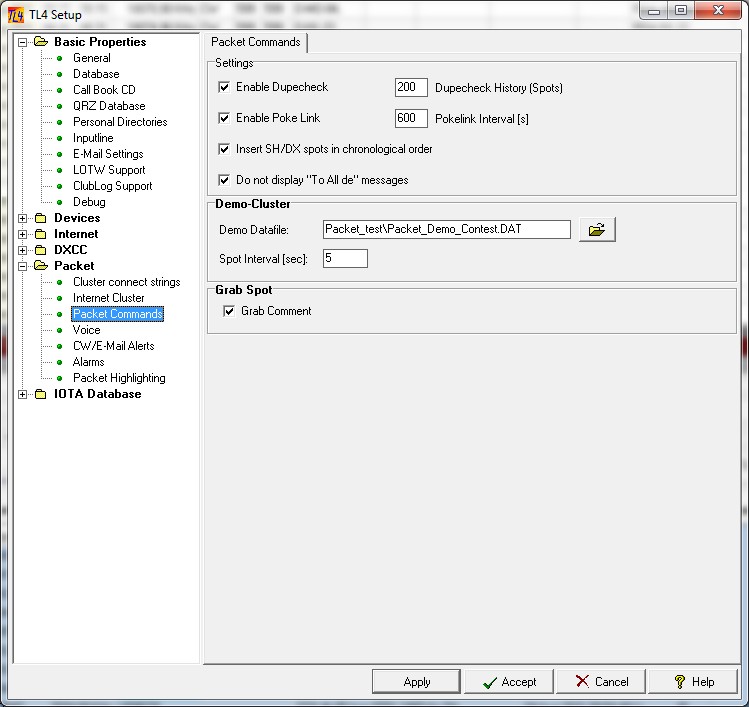
Figure 133: Packet Commands
Settings:
Dupecheck facility:
When enabled the Dupe check facility will allow to suppress identical spots from different cluster sources, e.g. Packet Radio and Internet. The procedure is as follows:
The checking for duplicate spots is performed for inputs during the current session only. Since the number of spots in the packet grid can be enormous it would be extremely time consuming to check the whole packet database for dupes. Imagine there were, say 500.000 entries... In order to prevent slowing down the realtime processes in TurboLog 4 a range of spots can be specified for inspection. The spots in check range built up to the maximum size of the range buffer as specified above while the session is progressing. A range of 150 is a reasonable number. Assuming one spot every 5 seconds during busy contest periods the buffer would keep a history of the last 12.5 minutes when completely filled.
Please note:
Suppressing duplicate spots will only become effective if two spots within the check range are identical in all aspects, i.e. characters, blanks, structure and record length. Thus, spots retrieved from a SH/DX operation will not match those being transmitted in regular format since they are transmitted from the cluster in a specific format.
Pokelink facility:
The Poke link facility serves to stimulate the cluster to send a sign of life in periods of very low cluster activity. On the same token the user sends an alive signal. This may prevent him from being disconnected from the cluster due to inactivity. The procedure is as follows:
An internal timer in TurboLog 4 is reset with every data transfer action either from the cluster to the user or vice versa. If the idle time exceeds the specified poke link interval a carriage return ( empty line ) is sent to the cluster. It will respond with its prompt. Please note: The poke link interval has to be entered in seconds. 900 seconds equal to 15 minutes is a reasonable quantity. Do not select a value much smaller.
Enable Cluster Timeout Alert:
Some Internet Clusters turn out to work less reliably than expected. All of a sudden the stream of Packet Spots may be disrupted for what ever reason. The disruption may not be noticed by the user immediately since the internet link as such remains active. This is indicated by the green background color of the rightmost panel on the Status Bar. In order to overcome the problem that a Cluster Timeout is not detected for a too long period of time we have created the Cluster Timeout Alert facility.
When this item is checked an alert is generated if the Cluster Timeout exceeds the user specified time of no spots being received. A disruption time of 15 minutes appears
to be a reasonable value. The following warning would pop up:
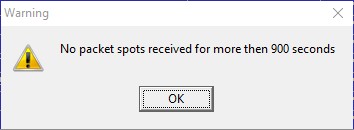
Figure 134: No Packet Spots Warning
After the specified wait period is elapsed a CW Hear Alert is produced by the PC's speaker and a warning pops up on the screen. The CW message being played can be specified by the user under the item Cluster Alert of the CW/E-Mail Alerts tab sheet of this Setup facility. In order to continue the pop-up message has to be clicked for confirmation.
Finally, the Internet Cluster has to be disconnected and then reconnected again.
Please note
We recommend to activate this facility in case you experience unstable cluster connections. Thus, the default is on Checked.
Insert SH/DX spots in chronological order:
If checked all Packet spots recalled from a cluster by means of the SH/DX command will be inserted in the Packet table in strict chronological order. This will arrange all spots according to their time stamp from the cluster "upwards" from the current line. In order to retrieve the spots you need to scroll into the past ... which is upwards on the screen. The main advantage of this sorting is a non disrupted spot history which is ideal in order to retrieve data.
If unchecked all spots will be arranged as they come in from the cluster ... just as in TurboLog 3. This may be advantageous in some short-term cases. The spot history, however, will be disrupted given rise to a number of pitfalls when there are brand new and old spots close together.
Do not display "To ALL de" messages:
Check this item if you want to get rid of all the many nuisance messages like cluster self-advertising, junk-type discussions or outbreaks of ideological statements. Unfortunately, these times attention is quite often saturated by these broadcasts. Furthermore, it requires special action to select and delete the nuisance. With this item checked any "To All de" message are discarded right away. None of the messages is saved somewhere. From the moment you uncheck the item broadcast messages will appear again.
Demo-Cluster:
The Demo - Cluster facility is a very useful tool in order to study the packet data flow. The user can create his own demo data files by selecting a suitable ASCII file from the file menu. Clicking the dotted button will open a file menu select box. The selected file will be played on activating the demo facility from the packet menu bar sub item Dis/Connect. The Spot Interval allows to adjust the time interval between the sequential spot transmissions. The interval has to be entered in seconds.
If you have finished making changes on the tab sheet you can save your modifications by pressing the Accept button. If you want to save your changes and want to let them become active immediately you need to click the Apply button. This includes the action of the Accept button. Clicking the Cancel button will close the tab sheet without saving any changes. The Help button will surface this help topic.
Grab Spot:
If you grab a Packet spot by using Ctrl+G or Drag & Drop action the content of the spot's comment field will be copied into the Comment field on the Log input line. This is the default. If you do not want any comment being copied you should check off this item.
Please note:
The change becomes active after a new start of TurboLog 4.
==========================================================
The sub item Internet cluster sites is accessed from the following tabsheet:
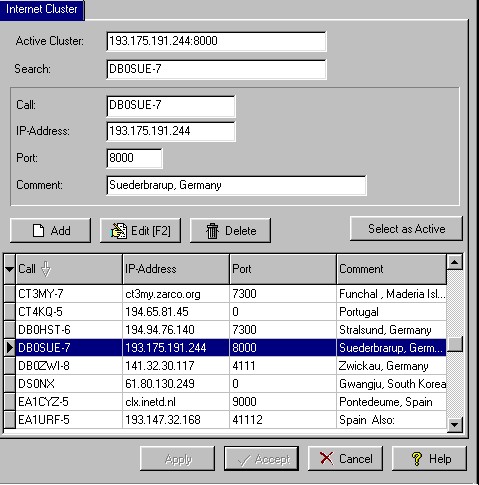
Figure 135: Cluster Database
A complete description of the various entries which can be made to this tab sheet is given in the topic Connecting to Internet cluster sites. Currently (Thursday, December 12, 2024) there are about 300 sites listed in the table. Whether they are really available for you needs to be investigated from your local site.
Among the entries is an access to an internal server called LOCALHOST. This facility searches for internal servers and is enabled to connect them.
==========================================================
The sub item Voice alerts is accessed from the following tab sheet:
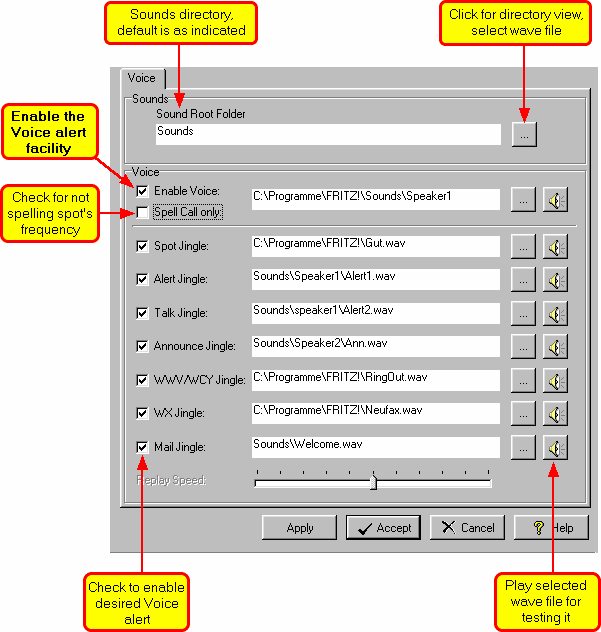
Figure 136: Editing Sound Alerts
For the time being most Voice alerts are related to packet items. The Voice alert facility makes full use of the internal WINDOWS media player. The current implementation allows to play wave files ( .wav ) only. The user can freely assign wave files to the various packet alerts. Wave file samples are available from many sources these days. You are free, however, to even generate files yourself by using the recording facility of the media player .... off line of course. Thus you could record your own spelling of numbers, letters and punctuation characters as requested for spelling spotted calls and frequencies .... and talk to yourself on the event of the selected alert. Please note the correct naming of the files as given in the examples for "Speaker1" and "Speaker2". We strongly recommend to collect your selection of wave files for the various alerts under the "...\TL4\Sounds" main directory.
The following alerts are implemented for the time being:
| Spot | initiated upon arrival of a DX spot which passed selected band filters (see Bands & Modes) |
| Alert | goes off if a DX spot matches the criteria as set in the call alarm facility |
| Talk | sounds upon arrival of a private Talk message to your connected call |
| Announce | played upon arrival of an announcement ( To All de ... ) |
| WWV/WCY | indicates arrival of a new WWV or WCY report |
| WX | informs of the arrival of a weather report ( WX de ... ) |
| alerts you of a mail message which has arrived for you |
The Voice alert facility has to be activated by checking the appropriate check box first. If the path in the edit box leads to a valid wave file you can play it for test purposes by clicking the loudspeaker button on the same line. As indicated in the edited screenshot above you can expand the directory view by clicking the "..." button. This allows you to select any wave file available on your computer and to replay it. Likewise, if you know the path to a particular wave file of your choice you can insert it into the edit box directly. If you have selected a new file or made any changes on the tab sheet you can save your modifications by pressing the Accept button. If you want to save your changes and want to let them become active immediately you need to click the Apply button. Clicking the Cancel button will close the tab sheet without saving any changes. The Help button will surface this help topic.
On a busy cluster site spelling the call and frequency of a DX spot may be too time consuming in order to keep track with the sequence of new spots appearing. In this case you can turn off spelling the frequency by simply checking the check box in front of the "Spell calls only" entry item. Furthermore, you can check off even the call-spelling, thus allowing only the spot alert jingle to be played. The track bar named "Replay Speed" is deactivated for the time being since no reasonable and common procedure for this task is supported by WINDOWS.
Please note:
It should be in your own interest to select Voice alerts as distinctive and as short as possible. In case CW alerts and Voice alerts are activated for the same packet alert item TurboLog 4 will automatically set priority and select the CW sound to be played. If a Voice message is played while a CW alert from another alert item goes off both sounds will be mixed and played simultaneously. The Voice alert facility proved to work perfectly on all WINDOWS versions from 98 to XP. Of course your PC needs to be equipped with a suitable sound card and appropriate drivers for supporting the hardware.
This menu item is split into two sub topics:
The bad news on all WINDOWS versions is the poor performance on real time operations. Unlike DOS all access to the computer's hardware resources are controlled by WINDOWS. This means that there is virtually no chance for an application program to control ports and devices in true real time. This is most annoying for generating CW signals. Since starting a real time task will always undergo a scheduling process applied by WINDOWS. If for example a signal is turned on the start time will be affected by a random jitter. The jitter may be small on fast machines but will always be present and depending on processor load and WINDOWS self administration procedures. In case of CW the keying performance will be poor and unpredictable. This is unacceptable to the ears of a discerning CW operator.
Second bad news is that the PC built-in beeper cannot be controlled by an application program in modern versions of WINDOWS any longer.
Both deficiencies result in a real headache for every software designer when high quality CW signals are to be generated.
In view of these deficits it took us many a day of experimentation with procedures and prototype software before we finally arrived at a highly sophisticated solution which works perfectly on all WINDOWS versions from 98 to XP. This implementation is based on using the sound card for generating CW signals. Since all modern PCs are equipped by this piece of hardware this should not be a real restriction.
In this topic we are dealing with CW hear alerts only. Keying a comport for transmitting CW will be dealt with under the configuration menu sub item Devices --> Morse keyer.
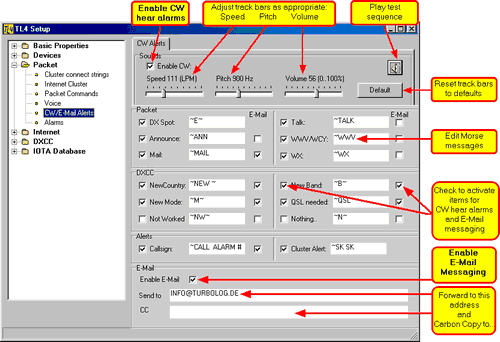
The sub item CW alerts is accessed from the following tab sheet:

Figure 137: Editing CW Alerts
Upon enabling the CW hear alerts you should adjust the track bars to your personal habits. Morse speed is given in Letters Per Minute ( LPM ). With respect to the dash-dot-ratio we fully comply to the international standards ( 3:1 ). Rise time and decay of a pulse were set to be 1% of the pulse length. The intra-letter separation is set to the length of 3 dots while the word spacing is at least 5 dots in length. This yields a perfect CW sound.
CW speed can be customized within the range of 30 to 300 LPM while pitch can be adjusted within the frequency interval from 500 to 1500Hz. Volume control covers the full range from 0 to 100%. After you have made your adjustments you need to click the Apply button in order to let them become effective instantly. If you click the loudspeaker button you will hear your customized version of the message TURBOLOG being morsed.
You can reset the track bar positions to the factory defaults by simply clicking the Default button.
We have implemented the following alert categories and items:
Packet:
•DX Spot ... initiated upon arrival of a DX spot which passed
•selected band filters (see Bands & Modes)
•Announce ... played upon arrival of an announcement ( To All de ... )
•Mail ... alerts you of a mail message which has arrived for you
•Talk ... sounds upon arrival of a private Talk message
• to your connected call
•WWV/WCY ... indicates arrival of a new WWV or WCY report
•WX ... informs of the arrival of a weather report ( WX de ... )
DXCC:
•New Country ... played on arrival of a spot for an all time new country from
• the current DXCC list
•New Mode ... played on arrival of a spot for an all time new mode
• with respect to the band plan definitions
•(see Bands & Modes)
•Not Worked ... signaled if spotted country was not worked during
• the current period on any mode
•New Band ... alerts of an all time new band spot
•QSL needed ... you still need a QSL for this spot ( Band and/or Mode)
•Nothing ... there is nothing interesting on this one
Alerts:
•Alert... goes off if a DX spot matches the criteria as set in the call alarms facility.
•For the time being you can extend the alerting CW sequence by means of the following significant placeholder notations:
•#C --->Callsign,
•#B --->Band
•#M --->Mode
•#D --->DXCC Mode
•Thus, in the default example as shown in the screen shot above, you could easily compose a CW Alarm string like: ~CALL~ #C~ #B~ #M~ #D which includes all placeholder options or any subset in any order.
•Please strictly follow the notation as outlined above: There must always be a blank in front of the # control character and the delay character ~ needs to be directly put at the tail of a word or its placeholder.
•Cluster Alert... This message will be keyed if ...Disconnected... or ...Reconnected... is received from the Packet Cluster in order to alert you of a broken link failure or ... more importantly...in case of a "quiet" link disruption being sensed and resulting in a Cluster Timeout Alert.
The " ~ " character introduces an incremental short delay. Multiple increments in a sequence are permissible.
You need to mark the check box left to an alert item if you want to activate it.
If you have finished making changes on the tab sheet you can save your modifications by pressing the Accept button. If you want to save your changes and want to let them become active immediately you need to click the Apply button. This includes the action of the Accept button. Clicking the Cancel button will close the tab sheet without saving any changes. The Help button will surface this help topic.
CW alerts are given priority over Voice alerts if identical items had been checked. This makes sure that every spot alert is rendered only once, either as Voice or CW alert. This is an important feature if you are connected to a busy DX cluster. The CW alerts are signaled in timely order with respect to the categories: Packet > DXCC > Alerts.
==========================================================
In addition to local Voice and CW hear alerts these events can also be forwarded by E-Mail to a portable internet device at a remote site. The DXCC correlated Packet spot filters as designed for the CW alerts are used for triggering off dedicated E-Mails which will inform the user of a significant event. Depending on the filter selection this could be an All-Time-New-Country, Mode, Band or the like. The user thus has a chance of getting home in time to work the new one.
In order to facilitate the E-Mail forwarding based on Packet spots the user first has to enter the necessary E-Mail settings under the Basic Properties setup. After this has been completed and a test mail was successfully received by the addressee the user should enable the messaging facility and assign the appropriate filters on the extended CW alerts tab sheet which is presented below:
Careful considerations have to be applied on forwarding spots. By all means the mailing rate must be kept as low as possible. If not, automated internet node supervisors would identify frequent mailers as a potential source of spam and block the suspect. Thus, we have built in the following general provisions to prevent any trouble with your provider:
As you will notice we do not allow to forward every incoming spot. (Please think of contest times with spot volumes of a 100 per minute or so... ).
We have designed a built-in queue which will send mails at an interval of 30 seconds.
Depending on the user's DXCC records he himself will have to consider to check only those filters which assure a reasonable low mailing rate. Otherwise he may soon be over flooded with mails. There are probably too many filters checked in the example above. In many cases only an All-Time-New-Country and a Callsign Alert (see topic Alarms below) will justify E-Mail forwarding... . Even these restrictions will trigger enough false alarms and mails due to frequent cluster abuse.
The following is a sample of a forwarded E-Mail based on the result of the DXCC filter for a New_Band.
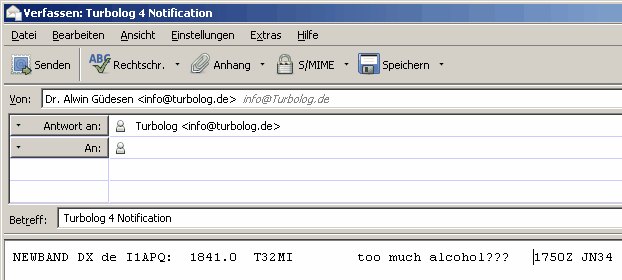
Figure 139: Forwarded Spot Filtered for New_Band
As will be noted we forward the filter result along with the complete spot. Thus, the user can make up his/her mind with respect to a suitable reaction on the mail.
============================================================
Please note:
This tab sheet can also be accessed from anywhere in TurboLog 4 by the hot key CTRL+ALT+C.
Please further note:
Like every other grid the content on the Alarms tab sheet can be customized. A right mouse click over the grid area will surface the context menu assigned to this grid.
The menu item Customize Gridview allows you to to select and arrange columns for display.
The user can define alarms to be triggered by distinct Calls or Prefixes which are spotted on the Packet cluster. Both items can be combined with BAND and DXCC-Mode of appearance
in order to receive an alarm only if a distinct country is spotted and matching the Band/Mode conditions as specified.
Furthermore, a time interval (UTC) can be specified for an Alarm to be triggered off. Just edit Startinterval and StopInterval accordingly. The alarm will then only be processed if its spotted time is within the specified time interval. This is a most beneficial feature with respect to propagation to a remote DX area of interest. The default time interval is from 00:00:00 to 23:59:59 .
Please also note:
If the potential alarm spot does not match Band/Mode and the interval period:
•It will not be displayed in the Alarms & Messages window.
•There will not be a CW alert.
•The alarm will not pop up on the status bar.
The alarms need to be edited on the following tab sheet before they can be applied:
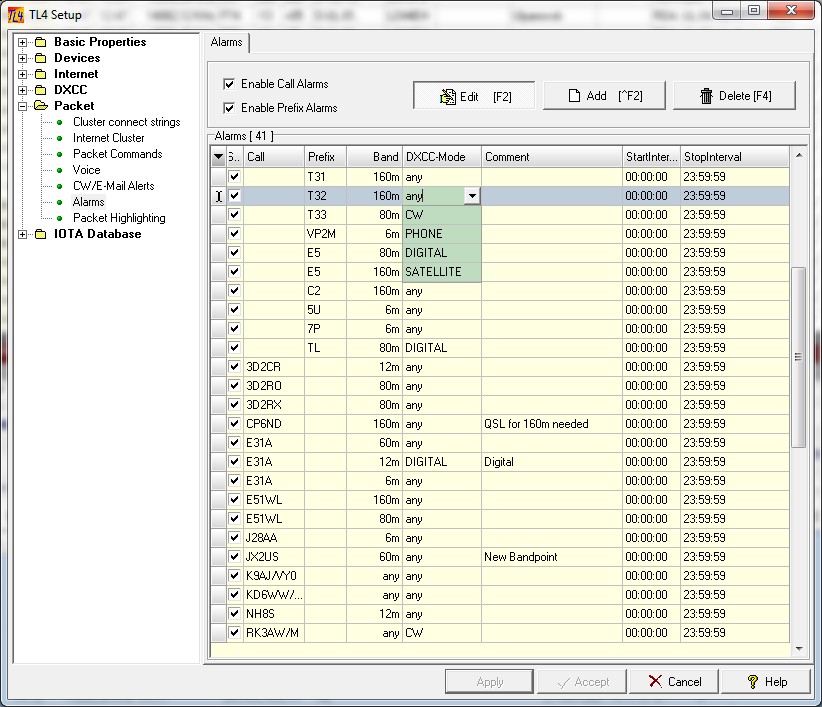
Figure 140: Setup for Call and Prefix Alarms; e.g. editing the DXCC-Mode
You can define a virtually unlimited number of alarms. Checking every spot against a large number of alarms, however, will slow down processing power of your PC. Thus one should include alarms for the very "important" calls, prefixes and Band/Mode combinations only.
Enable:
In order to speed up alarm checking you can enable either call or prefix alarms. Of course you can also run both alarm items if there are few alarms set or you have a fast PC. Each alarm can be set or disabled individually.
Please note:
If you set prefix alarms the prefix must be identical to the country`s main prefix as specified in COUNTRY.DAT. Otherwise there will be no match to an incoming spot. No jokers are allowed at this facility, e.g. JD* will not work, JD1 would be incorrect but JD would trigger the alarm for Ogasawara and Minami Torishima.
Press the Add button:
In order to add a new alarm to the list. Every alarm can be described in the Comment field.
Content of the Comment field will be displayed along with Call/Prefix in the alarm message which is shown on the Status Bar when an alarm is triggered. The same information can also be transferred to the Alarms & Messages window for permanent display. However, this requires user interaction and adequate customization of the window in order for the CallAlarm item to be selected for display.
Press the Edit Button
in order to edit the highlighted line.
Press Edit
again to finish editing.
Press the Delete button
Likewise you can use this command to remove a line from the list.
Double click
While you are in editing mode you have to double click on the field which you want to edit.
Don't worry for upper or lower case entries on the call and prefix fields. Upon leaving the edited line all entries will automatically be transformed to upper case.
The default entry for the band is "any". If you want to select a distinct band you only need to click the triangle in order to open the band select box. The select box contains all bands which you have defined in Bands & Modes.
Pressing the Cancel button
will allow you to leave the Alarm tab sheet.
When a Call Alarm is triggered it will be displayed on Panel 2 of the Status Bar at the bottom of the Main Logbook Window. An example is shown in the screen shot below:

Figure 140: Call Alarm displayed on the Status Bar
=========================================================
This tab sheet allows you to specify in depth analysis of Packet spots for DXCC relevance with respect to your logbook records. Furthermore, search items/strings can be defined to be applied on the content of the Comment field of the spots.If anyone of the search items yields a match with content in the Comment field it will be highlighted by a user specified color.
Calls which were worked before can be highlighted for the benefit of hints on the operator's behavior, e.g. on his QSL practice etc..
For those users hunting DXCC slots, i.e. to complete all DXXCC Modes on any Band the detailed slot analysis will be of particular interest. The background color of the DXCC Indicator Field in the Packet tables will indicate the results of this analysis. Colors can be customized by the user.
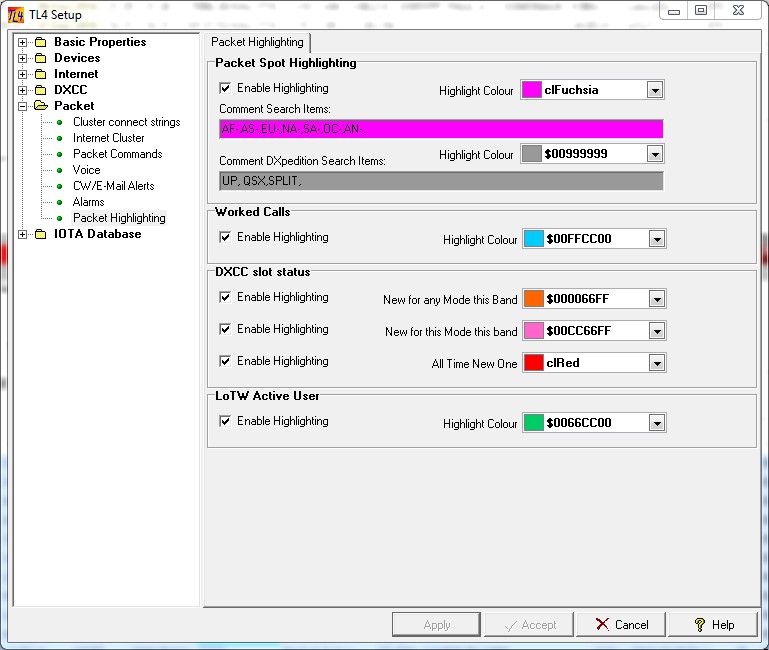
Figure 141: Setup for Highlighting String Items in Packet Comment Fields
Packet Spot Highlighting:
Activate and define search items for string elements the Comment field of a Packet spot here.
The facility must be activated by ticking off the check mark to the left side of Enable Highlighting.
Please note:
In order to exploit this facility the Comment field must be on display in the Packet tables
You can select from two independent highlighters:
1. The upper example shows an application to search for string items of IOTA keywords in the Comment field of Packet spots. The background color of the Comment field in case of a match can also be customized here. This facility is in particular well suited to point the users attention to IOTA-Keywords if they are provided with the Packet spot. Thus, we have included the leading part of the IOTA-Keywords (=Continents) as search strings by default. The user can add other search items of interest to the defaults. In order to prevent false alarms the search items should at least contain three characters. All items need to be separated by comma as shown in the screen shot above. The user can specify up to 20 search items.
2. The lower example specifies DXpedition related string items in the Comment field, such as UP, QSX or SPLIT. A match in the Comment field results in a background color which can be defined by the user. The example in the screen shot above shows a gray color which is a good compromise between conspicuity and readability of the text characters.
The facility performs a simple matching process. Thus, nor wild card characters nor logical combinations can be applied. Furthermore, the matching process is not case sensitive with respect to search items and text in the Comment field.
Worked Calls:
You can enable highlighting of Calls in Packet spots if they are 'known' by TurboLog 4 which means the particular Call has been logged before. We check for Base Calls. Thus, it may also have been worked in a compound call. The background color of the Call field in the Packet table can be selected by the user from the color menu.
DXCC Slot Status:
Three categories of results from the DXCC-Mode_Band analysis can be enabled individually. The assigned background colors will highlight the DXCC Indicator Field. The content of this field provides additional information besides the highlighting alarm.
There is a specific category for an ALL TIME NEW ONE (ATNO) being spotted.
You can highlight Calls from active LoTW users. Highlighting will occur if calls in Packet Spots and received JT records match to a listed call. The call list is derived from a report file provided by the ARRL.
This highlighting facility requires preparatory work which is described in the paragraph LoTW User Activity which is a part of the Basic Properties menu.
Highlighting Priority Scheme:
While the search of the highlighting routine is running the results of the search are prioritized as indicated. Only the highest priority item found will win and be highlighted by its selected background color.
•All time new DXCC entity ( "New country" ) . >>> This is the highest priority
•New for any mode on this band ( "New Band" )
•New Mode for this band ( "New Mode" )
•Call was worked before, some Mode - some Band. We check for Base Calls. Thus, it may also have been worked in a compound call.
•LoTW User Activity, if enabled in the Log Setup menu. >>> This is the lowest priority
The highlighting colors should be selected carefully with respect to conspicuity and good readability. Furthermore, the contrast to the text contained in the highlighted field must be maintained.
Please note:
The facility will not work if the Packet Comment Field has not been selected for display on the screen.
BUTTONS:
| Accept | Accepts inputs and leaves frame. |
| Apply | Puts changes into action. |
| Cancel | Cancels all changes if not in action yet and leaves frame. |
| Help | Opens (this) help window. |
| Add | Adds new line in order to enter an alarm. |
| Edit | Edit field on highlighted line. |
| Delete | Deletes highlighted line. |
Hot Keys:
| Ctrl+Alt+C | Directly opens the Alarms & Messages tab sheet for editing |
This topic was last edited on Thursday, 12-Dec-2024, at 13:30
