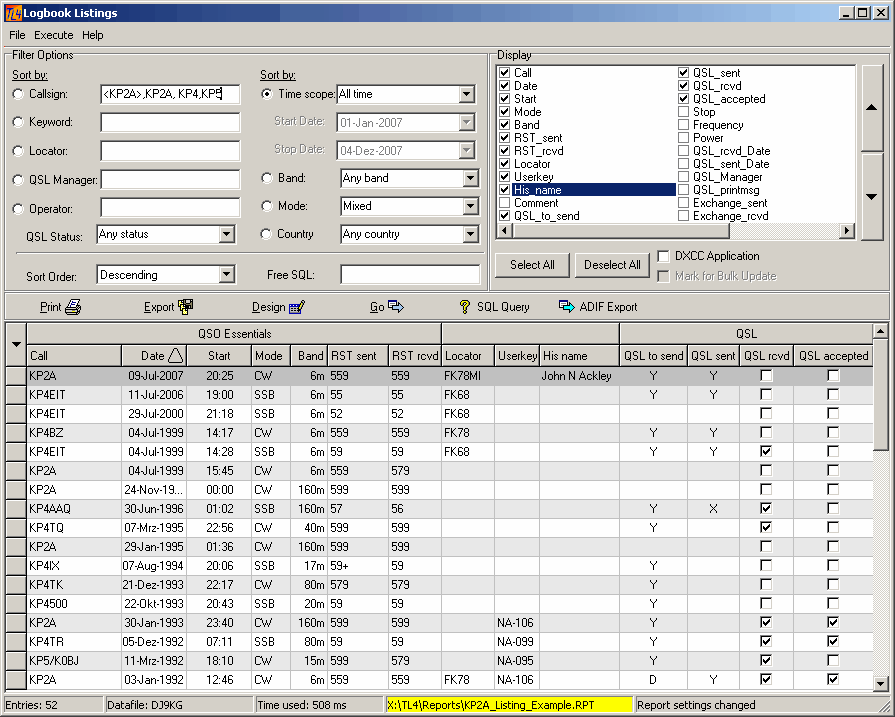
Logbook listings will allow you to search for single or multiple items in your logbook records and to display/list those records that match to the search item(s). The search items can be logically aggregated by AND conditions. Thus highly complex queries can be generated automatically by simply selecting the search items from the list of choices and/or entering the search string(s). Bearing in mind that TurboLog 3 just allowed you to search for one item this facility in TurboLog 4 now offers "multi-dimensional" queries of enormous combinatorial complexity. In addition to this the power of SQL-queries is also exploited in order to generate printed applications for the DXCC award, ready to be shipped along with the QSL cards to the ARRL's DXCC desk.
The Logbook Listings facility is accessed via the Options --->Lists and Reports menu and selecting the sub menu item of this very name. Likewise it can be accessed by pressing the global hot key Ctrl+L from anywhere in the program. Both actions will result in displaying the following screen shown here with an example input:
General features:
•Highly complex search tasks can be performed since all entry fields can be loaded with search strings at the same time.
•All manual inputs to the fields in Filter Options are automatically internally extended with a wildcard character, just like the * in the General Filtering facility. Thus, you will receive search results even for a leading fragment of the input. If, for example, you would enter KP2A into the Callsign field you would receive a listing of the following entries: KP2A, KP2AX, KP2AXY,KP2AXY/MM, ... etc..
•If you want to perform a precise search for anyone of the available Filter Options the search string has to be included in < ... > brackets. Thus, for example, the input string <KP2A> would bring up all entries for KP2A only.
•Every input field can be loaded with multiple entries. All entries must be separated by comma. The number of entries depends on the variable internal SQL buffersize. You will receive a warning if it was exceeded. Thus, you can search for various items in combination and collect all results in one list .... as shown in the example above.
•Every input field is eqipped with an input stack. After you typed the input and left the field by pressing the Return/Enter key the input will be transferred into the stack. Pressing Ctrl+CursorDown with the cursor on the particular input field will open the stack, thus allowing you to select an earlier input and moving it into the field by simply pressing the Enter key again. This closes the stack on the same action. The stack will be present for the current session only.
•Every Filter Option can be selected for sorting. The master field for sorting is indicated by the activated radio button. The default is on sorting by timely order ( Time Scope = All Time ). All other sorting is performed by alphabetical order. Of course just one sort criterion can be selected at a time...
•No entry in an input field of the Filter Options will be treated as "Any".
•The user has ful control of the arrangement of the output data being displayed in the data grid.
•While standard print templates will be used for the logbook listings and export operations a special layout as requested by the ARRL's DXCC desk will be used for printing DXCC applications. Allthough not recommended: The user could customize the layouts of all templates by means of the Print Report Designer.
Filter Options:
Callsign:
Enter any leading call fragment or prefix into this field if you want to perform a search for callsigns. The general features as described above apply for this action ( multiple entries, precise search, etc. ... ).
Keyword:
This is where to enter search strings related to the Keyword files defined in TurboLog 4. The search facility is of particular interest for all IOTA-enthusiasts. If, for example, you would enter: EU-,AS- in this field and "push" the radio button as to sort by Keyword you would obtain a nice listing of all Asian IOTA numbers followed by all European numbers in one list, sorted by IOTA-number.
Locator:
Enter locator/gridsquare search strings in this field. Entering: JO4, for example would bring up all log entries with locators JO40, ..., JO49.
QSL Manager:
In search for QSL-Managers you can enter a call or call fragment here. Of course, just like in all other fields, you can enter multiple calls and/or call fragments as well.
Operator:
This field can be used to retrieve log entries from different operators under the same call by evaluating the My_name field. Thus, this search feature is of particular interest for operators at club stations, expeditions, etc. If you had signed your QSOs with your private indicator ( such as name or call, for example ) you can later easily extract your log contributions.
QSL Status:
This drop down box offers the following choices:
Any
| QSL sent | ( ... you have printed/sent a QSL ) |
| QSL to send | ( ... you marked the log record to send a QSL ) |
| QSL received | ( ... even if you did not sent one.) |
| QSL not received | ( ... you did not receive a QSL for the logged QSO ) |
| QSL accepted | ( ... by DXCC desk. ) |
| QSL not accepted | ( ... received but not accepted by DXCC desk yet. ) |
| Find No_QSLers | ( ... lists CALLs and log record(s), regardless of how often the Call has been worked and whether you have sent a QSL yourself but which have never sent any QSL for none of the contacts during all time. ) |
The rationale behind each item is explained in the bracketed text.
Please note:
The Find No_QSLers item as implemented on this menu may yield multiple entries of the same call if the log contains multiple QSOs with it. This may be annoying if the list is to be exported and edited for later use as a Personal Directory, for example. This application of the export is an extremely useful feature that allows you to sort out the bad guy right at the moment you enter a particular call. Reducing the output to just one entry per call can only be obtained in a special query which unfortunately is not compatible with all other queries behind this menu. The desired output, however, can easily be obtained by starting a special query from the SQL Query button on the center section of this frame. The procedure is described below along with the introduction of the button.
Time Scope:
Time scope contains two options:
All Time
This option does not apply any timely filtering to the data but passes all log entries.
Date
This option allows you to apply a Start Date and a Stop Date. Only data between these dates will be passed for display and listing. The default Start Date is the start time of the current period. The default Stop Date is "today". Selecting this option will enable the date entry right next to the drop down box. Clicking the select field will open a calendar box for ease of operation:
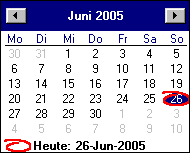
Figure 353: Calendar dialogue box
The box opens with the date of today as default. By clicking the left or right arrow mark you can navigate through the months and years. Just a final click on the particular day will complete this operation, close the box and insert the selected date for the filter edge. The same applies for the other date filter edge. ( I just cross my fingers that the content of this WINDOWS component comes out in your own language ... as it is supposed to...).
Band:
This drop down box offers the following choices:
Any Band
All bands will be investigated.
User Defined
Only log records on those bands will be taken into the survey for which the user has checked the Use Locator item in the Bands & Modes table.
6 Bands
All bands which were marked by the user in the Bands & Modes table as belonging to this group of bands will be taken into the search.
9 Bands
All bands which were marked by the user in the Bands & Modes table as belonging to this group of bands will be taken into the search.
10 Bands
All bands which were marked by the user in the Bands & Modes table as belonging to this group of bands will be taken into the search.
WARC Bands
All bands which were marked by the user in the Bands & Modes table as belonging to this group of bands will be taken into the search.
VHF Bands
All bands which were marked by the user in the Bands & Modes table as belonging to this group of bands will be taken into the search.
DXCC Bands
All bands which were marked by the user in the Bands & Modes table as belonging to this group of bands will be taken into the search.
Single Bands
All individual bands which have been defined in the Bands & Modes table can be selected as single entries. Thus, the default list of choices starts with VLF, 160m, ... and ends with ... 1.2cm for the time being.
There can be multiple band entries like in all other fields as well. Additional bands have to be entered by manually typing.
Mode:
You can select the groups of DXCC-modes from this drop down box which you earlier defined in the DXCC menu. The default mode is Mixed which will bring up all contacts regardless of any particular mode. Besides this all other individual modes can be selected and/or entered. Be careful to select the correct mode name as defined in Bands & Modes. Multiple mode entries are possible.
Country:
You can search for countries from the following drop-down box which contains all country names in alphabetical order:
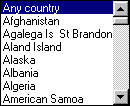
Figure 354: Select Country
The default is on Any Country. You can add more countries by manually typing the countrynames, each separated by comma. Please make sure you pick the correct name from the list of countries as defined in TurboLog 4.
Sorting the listings:
Sort by
Pushing the radio button to the left of a select field defines this field as the master field for sorting. The default sorting is by timely order. Alphabetical order will be applied on any of the other sort fields.
Sort order
The drop down box Sort Order will allow you to select between Ascending and Descending sorting of the data in the grid. The sorting is always referenced to the column of the selected sort master.
Please note:
Sorting by Band internally refers to the Nominal Frequency belonging to it as defined in the Bands & Modes table.
Free SQL:
This entry field allows you to create any SQL query. Creating a valid query, however, requires some knowledge of the SQL language. Thus, it will be the expert's playground in most cases. Adding this facility, however, offers the highest degree of flexibility in retrieving any kind of information which is available in your log entries, somewhere ... hidden in a wrong field ... only fragments of it known ... or just the weirdest combinations of data to be retrieved ... . There is virtually nothing in your database which cannot be found by means of this SQL facilty.
Clicking the hotspot will open the SQL Filter and Design facility as outlined in a special paragraph on these topics.
Here are just a few simple examples of syntax in order to show what can be done:
LOCATOR LIKE 'IL' this example will yield a list of QSOs with stations whose locator starts with IL.
CALL = '5X1W' will bring up exact matches to the string in ' ... ' ; the search is case sensitive.
CALL LIKE '5X' retrieves arbitrary call strings starting with 5X; no wildcard character * or % required.
MODE IN ('RTTY','PSK31') search list in order to retrieve the specified modes.
CALL LIKE '%/MM%' will find all Calls containing the string /MM. Thus, all maritime mobile stations can be found.
QSL_SENT = 'X' will find all log records which were X - marked by the DXCC Application facility ( ... see below ).
Of course there are much more syntax elements and the full range of logical connections ( AND, OR, ..., etc.).
For more details: We refer to the paragraphs on Simple Filter and SQL Search Facility.
In case of special problems: Do not hesitate to contact TurboLog Communications for assistance.
All log entry fields available in <%PRODUCTNAME%> can be selected for being included in the listings. You can select the fields of interest from the following select box:
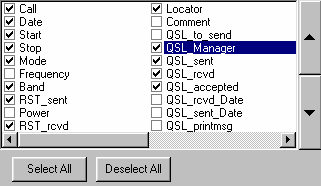
Figure 355: Selecting distinct fields for display
Checking an item will include it in the listing. Every field can be moved in order to appear at the desired position in the list by applying the keys to the right of the box. The upper key will move the highlighted item "upwards" which means to the left in the field arrangement of the listing. Likewise: The lower key will move the selected item to the right on the grid. All parameters with respect to grid design will be saved on user's command in a special report file. Please see the File menu of this frame for details ( ...see the File paragraph below).
Besides this you can click the Select All button which will select all fields for listing/display or the Deselect All button which clears any selection of fields.
This facility is extremely helpful at preparing a classical DXCC application as required by the ARRL's DXCC desk. Both, QSLs and a list of the QSL details have to be provided in a given format. TurboLog 4 and the Logbook Listings facility help you to compile a list of the QSLs you will need for a specific award application. Of course the user will always be responsible for garnering the required cards from his (...hopefully...) well structured QSL archive.
The specific routines for gaining a list of candidate log records for the DXCC application are triggered from the DXCC Application checkbox.
Its default, however, is on unchecked. Depending on the kind of award in mind the following additional selections have to be made:
•Mixed: ( Apply for DXCC country count only; regardless of Band and Mode permitted for the award ). No particular input required.
•Mode: ( Apply for DXCC country count for a particular Mode; regardless of permitted DXCC Bands ). Select the particular DXCC Mode ( CW, Phone, Digital or Satellite ) from the Mode drop-down box. Please enable modes not appearing on the list in the DXCC setup tab sheet.
•Band: ( Apply for DXCC country count for a particular Band; regardless of DXCC Mode ). Select the particular DXCC Band from the Band drop-down box.
If you checked the DXCC Application checkbox another checkbox right below it will be enabled. If you check this one which is named Mark for Bulk Update all log records on the data grid will be enabled to be marked by an X in the QSL_sent field. Rationale for this procedure is to save you a lot of time at later-on marking the particular records for QSL_Accepted when your cards were positively checked by the ARRL and returned to you. This work will then be reduced to just starting the Bulk Update DXCC Accepted item from the Execute menu.
Please note:
With Mark for Bulk Update checked all records selected for the DXCC Application will automatically be X - marked when the list is rendered by the printer. Likewise, X - marking can always be started manually by selecting the item Mark DX CC Appl. as 'X' on the Execute menu as long as the correct records are on display. We recommend to check a few examples of log records in order to make sure the marking was performed successfully.
Please further note:
Before you perform large update operations on your log it is best practice having made a copy of the YourCALL.NX1 logbook file ( to be found in the ...\DATABASE directory ).
Pressing the Go button will start a logbook search for the valid candidates. All log records marked as QSL_received are potential candidates for the listed output. All entries from countries, however, which already have QSL_Accepted status have to be discarded. The final result will be displayed on the output grid, ready for close inspection and printing.
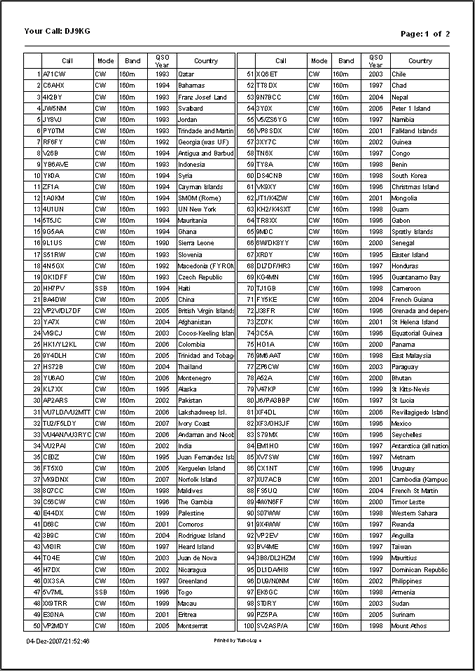
The following is a print example for a DXCC 160m-Band application:
With this list at hand the corresponding QSL cards can now be collected, sorted according to the list and prepared for mailing to the ARRL.
As indicated in the fore standing paragraph this facility will be extremely useful at processing the cards returned to you from the ARRL's DXCC desk. Instead of manually marking every single card as QSL_Accepted by using the QSL item on the logbook's menu you can Bulk Update the whole bunch of cards on just one mouse click!
The Bulk Update DXCC Accepted procedure has to be started from the Execute menu. It is the second last item on this menu. The procedure will look for log records which were X - marked in the QSL_sent field. It will leave this field unchanged but the QSL_Accepted field of the very record will be checked as Accepted.
Thus, you need to make sure that your selection of cards which you had sent out was definitely X-marked by the DXCC Application procedure!
Ideally, you will be informed by the DXCC desk that all of your submitted cards were approved for credit. This will allow you to run the Bulk Update procedure right away and enjoy all the new Accepted entries in TurboLog 4's DXCC facilities.
Please note:
You will finally have to run a DXCC Rebuild operation from the File > Database Maintenance menu in order to update all DXCC accounts after the Bulk Update DXCC Accepted was performed.
Don't worry if a small minority of cards was not credited for your DXCC records. You just need to identify the log records corresponding to these refused cards. Now you will have to edit the particular log records and simply remove the X from the QSL_sent field. Having done this for all the refused cards you can now run the procedure for the Bulk Update DXCC Accepted as described.
Likewise, you can list all X - marked records by means of the Simple Filter ( see example ) and/or by the SQL Search facility.
The File menu will allow you to load, save and delete your sets of parameters for a particular listing. All parameter files for the listings are saved in TurboLog 4's ...\Reports directory by default. The file extension is RPT. The File facilty will save you a lot of typing and is well suited to keep your standard listings. The File menu includes the following items:
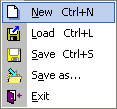
Figure 357: File Menu
New
This item resets all parameters of the report file to the factory defaults. Likewise you can press Ctrl+N for the reset operation.
Load
This item opens the File dialogue box and allows you to select one of your predefined parameter files for execution. Likewise you can press Ctrl+L in order to evoke the loading operation. This brings up the following file dialogue box:
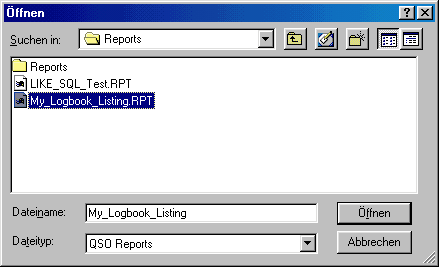
Figure 358: Load Logbook Listings Report File
Select the desired file and click Open to finish the dialogue and to leave the box in order to activate the parameter set.
Save
After you have made modifications to an existing parameter file which you have loaded earlier you can save all new parameters by selecting this item on the File menu. Likewise you can press Ctrl+S in order to save and overwrite the existing file from which you started.
Save as...
Following WINDOWS standards you must select the Save as... item from the File menu in order to create a new report parameter file. This action will open the file dialogue box as shown above and let you type the name under which you want to save your data. This name should be selected to be self explaining in order to quickly retrieve the correct file even after a period of inactivity.
Exit
Selecting this item will close the Logbook Listings frame.
The Execute menu contains the following items:
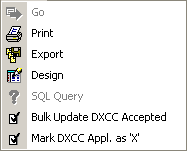
Figure 359: Execute Menu
Go, Print and Export are available as well as separate buttons in the Logbook Listings frame. The Bulk Update DXCC Accepted item will select all X - marked log records and update them to Accepted as described above. The Mark DXCC Application as "X" will X - mark all log records selected for DXCC Application but only if enabled after checking the Mark for DXCC Application check box.
Frame Status Bar:
The Status Bar of the Logbook Listings frame consists of the following panels ... from left to right:
Entries
This panel shows the number of entries in the data grid.
Table
This panel shows the data table ( = Log name ) accessed and under processing.
Time used
This panel indicates the processing time for the last operation in milliseconds. This gives you a feeling for the workload that was imposed on your machine by the data query which you created. While the report is processed the panel's background turns into yellow and the message "Report running" is displayed.
Report File
This panel presents important status information of the report file currently in operation. The status is indicated by the following background colors:
| Gray | The report file loaded is still unchanged. |
| Yellow | The report file was changed and the modifications were not saved yet. |
| Green | The report file loaded was saved. |
Double clicking into the panel area will open the file dialogue box, just like opening the File menu and selecting the Save as... item.
Last Action
This panel reminds you of the last action that you commanded for execution. It is important to know, for example, if you are about to perform a Bulk Update DXCC Accepted operation that you successfully processed the DXCC Application before. Among the messages in this panel are the following:
•Bulk Update
•Report cleared ( ...corresponding to the New item on the File menu )
•Report loaded
•Report settings changed
•Report finished
Buttons:
The following buttons are available in the Logbook listings frame:
Clicking the Go button or pressing ALT+G will start processing the selected query. The button will remain inactive (=grey) as long as the query parameters are left unchanged.
Clicking the Print button or pressing ALT+P will convey all grid data to the print routines. Before rendering the displayed data and graphics as a report the user can control its layout by means of the Print Preview facility. Before the Print Preview screen opens, however, the printer setup is called in order to allow you to select a printer, page size, page orientation and the like. In view of the total width of all fields the printer's default paper size orientation is set to "Landscape". Besides this you might be worth thinking of using a tool that emulates a finer print. FinePrint ( http://www.context-gmbh.de ) turned out to render excellent results for us. FinePrint can be selected from the list of printers after it was installed ... just like a real printer. It reduces print sizes by factors of 2, 4 or 8.
Clicking the Export button or pressing ALT+E will start the Print Previewfacility which contains a special menu item for export control. Before the Print Preview screen opens, however, the printer setup is called in order to allow you to select a printer, page size, page orientation and the like. For the time being TurboLog 4 offers export to:
Text file export ( ASCII )
EXCEL
HTML
Please note:
In order to receive a meaningful output on export operations the header of the print preview template must be as simple as possible. Weird results may be obtained on EXCEL exports in particular due to multiple rows of header information. Thus, EXCEL exports should only be started from the Export Buttons in TurboLog 4's data grid screens (... as this one). This assures automatically loading a special export template into the Preview Page.
If you export in EXCEL-CSV format ( Comma Separated Variables ) the default separator will be a " ; " . This is no bias for further processing since you can always change the separator if you open the file to be imported by means of the OPEN FILE menu item in EXCEL.

Clicking this button allows you to run any pre-designed SQL string. The query can be loaded from virtually any directory. The default directory, however, is TurboLog 4's root directory. The file dialogue box opens as to show ( ...according to your language ):
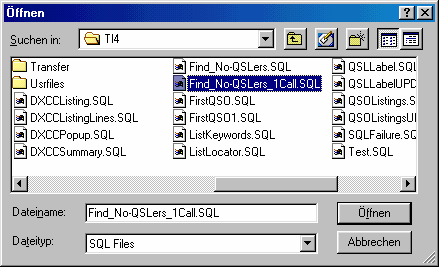
Figure 360: File dialogue box: Select query as appropriate
Hint:
Let us introduce the benefits of this facility by resuming the problem of finding No_QSLers in a listing which finally contains single entries for every call regardless of the number of contacts with this call.
Before you start the selected query you need to deselect all log fields from the grid except for the Call field. This is necessary in order to provide a single criterion for ordering only. If you would not have de-selected the other fields they would be included in the ordering mechanism.
The query will be started by selecting the item as shown in the screenshot and clicking the Open button. This will yield a listing of the following kind:
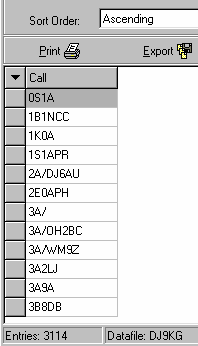
Figure 361: A sample listing of the SQL query
This listing can readily be exported for various purposes. One of the most interesting applications, however, is to transform this list into a Personal Directory and prevent yourself from working the bad guys and/or wasting money by even sending them QSLs. Don't be surprised, however, of the number of entries you may find in your own log...
The exported list ( txt-format, EXCEL,... ), however, still requires some editing in order to comply with the data format as specified for the Personal Directories. Main work to be done is to add a separate column right to the call-column that contains the resulting text to be displayed on screen upon a match to a particular call. Depending on the size of the list this could be done manually in the text-file or by exporting to EXCEL. The advantage of the latter is that filling of a column with identical information, for example: "Never sends QSLs" is very easy. After this manipulation the data should be re-exported from EXCEL in *.csv format. The resulting output contains both fields, separated by a semicolon. Final editing the .txt-file needs to be performed in order to correct the header information as requested, removing page breaks and footer content and renaming the file to the .dir extension. After these corrections the file can be imported by means of the Personal Directories Import facility.

Clicking the ADIF Export button will allow you to export all lists on display in ADIF format. This is beneficial for all purposes but of particular interest in case of a DXCC Online Application.
The ADIF Export operation is described in greater details in the paragraph on Manual Export to ADIF and LoTW. You are prompted by the file dialogue to specify a folder and name for the exported data from the display. Next you can select the fields which you want to be included in the export by the following frame:
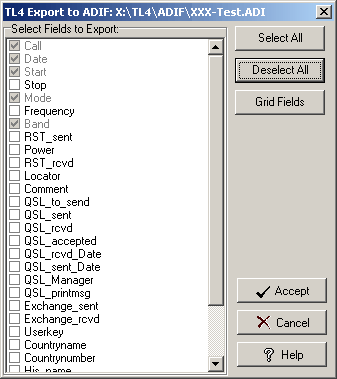
Figure 362: Select Fields for Export
The minimum data to be exported always consists of the fields which are marked as gray. They cannot be deselected. More data fields can be added by clicking the appropriate check boxes. When you have finished making changes click the "Accept" button in order to move to the next step or click the "Cancel" button to leave the frame and abort the whole export procedure. Clicking the "Help" button will bring up this help information.
On clicking the "Accept" button the export procedure is started and the progress bar and file information will be displayed. Pressing the OK buttons will finish the export.
Exporting to IOTAMEM
As in TurboLog 3 TurboLog 4 provides extensive support for the IOTA program through the IOTAMEM interface which is inherently available from this Logbook Listings facility. IOTAMEM is a program available from the IOTA committee which helps you track your IOTA award status and electronically update the IOTA checkpoint with your island QSO information.
In order to use this facility, you must enter the IOTA reference number for each island QSO into the Userkey field as you enter the QSO or subsequently, using the QSO editor. We strongly recommend you stick with the Userkey definitions as suggested.
Thus, an IOTA-listing can easily be performed by selecting the following items:
•Sort by Call with call field left empty,
•In Userkey field enter e.g. EU- in order to list all European islands worked,
•Select QSL Status as appropriate,
•Select QSO range by Date, Band, Mode, etc. as required,
•Select Fields for display/listing/export as required,
•Finally click the Export button from the menu bar ( see paragraph on Export above ).
Having set up the bands and modes and fields for export you can save that configuration using the Save and Save as... menu items under the FILE menu heading.
Active Commands:
KEYS/HOTKEYS:
| ALT+P | Start printing. |
| ALT+E | Start exporting. |
| ALT+G | Go! Start search/computation. |
| Ctrl+L | Globally: Open Logbook Listing facility. |
| Ctrl+L | Locally: Load report parameter file. |
| Ctrl+N | New: Resets Report file to factory defaults. |
| Ctrl+S | Saves report parameter file. |
| Return/Enter | Navigate through input fields; enable selected stack data. |
| Ctrl+CursorDown | Opens the input stack. |
| Ctrl+Return | ... with cursor on the field opens SQL edit box. |
BUTTONS:
Export
Go
| Select All | Selects all available log fields for listing. |
| Deselect All | De-selects all available log fields for listing. |
| DXCC Application | lists records as requested by DXCC desk. |
| Mark for Bulk Update | Enables X - marking of log records |
| Bulk Update | marks selected QSOs as Accepted in a single action. |
| SQL Query | Opens file box in order to select SQL string. |
CLICKABLES and HOTSPOTS:
| Drag separator of grid columns | Arrange width of columns. |
| Double clicking into SQL field area | ... opens SQL edit box. |
This topic was last edited on Thursday, 12-Dec-2024, at 13:30
